


Retentie van deelnemers
Laatst aangepast: 24-12-2025De retentie-functionaliteit houdt in dat de actiestarter/deelnemer wordt gevraagd hoe vaak hij of zij al eerder heeft meegedaan. Op basis daarvan kun je een afwijkend streefbedrag instellen, andere mails sturen op basis van het aantal deelnames en een badge toevoegen op de actiepagina. Dit is met name handig voor events die bijvoorbeeld jaarlijks georganiseerd worden.

Inhoud artikel
- Instellen edities
- Default streefbedrag afhankelijk van aantal deelnames
- Welkomst e-mail - Welkom terug!
- Badges - Maak het zichtbaar voor iedereen
Instellen edities
Via Instellingen > Edities kun je per niveau (website, segment, project) instellen de hoeveelste editie het is. Je stelt kiest eerst de editie:

Hierbij geldt dat er geen sprake is van erving. Als je op websiteniveau de 7e editie instelt wordt dit niet overgenomen op een onderliggend project. Daar moet je het dan dus alsnog handmatig instellen.
Na het instellen komt er in de aanmeldflow dan een extra verplichte vraag te staan:
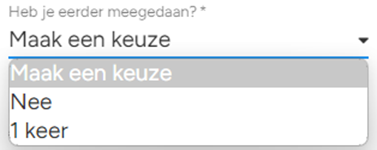
Vervolgens kunnen er op basis van het gegeven aantal eerdere deelnames andere functies worden getriggerd:
Default streefbedrag afhankelijk van aantal deelnames
Afhankelijk van het gekozen aantal, kan het voorgestelde streefbedrag variëren.
Voorbeeld: Doe je voor de eerste keer mee, dan is het minimale streefbedrag €300,-. Die je voor de tweede keer of vaker mee aan dit evenement, dan is het minimale streefbedrag € 250,-.
Dit kan je instellen op het niveau waar men zich kan inschrijven, onder Instellingen > Instellen streefbedragen. Daar kan er worden gekozen voor een streefbedrag, afhankelijk van het aantal deelnames. Op deze manier kun je deelnemers die al een keer een heel hoog bedrag op hebben gehaald, een volgende keer een lager minimaal bedrag laten ophalen. In de praktijk zie je dan vaak dat ze alsnog een mooi bedrag ophalen, terwijl de drempel om weer mee te doen en een bedrag te vragen lager is.

Welkomst e-mail - Welkom terug!
Op basis van het aantal deelnames is een andere welkomst e-mail te versturen. Zodoende kun je de deelnemer met een andere toon aanspreken als hij al eerder heeft meegedaan of als hij aan alle edities heeft deelgenomen.

Badges - Maak het zichtbaar voor iedereen
In de media (afbeelding/video) op de actiepagina kun je een badge tonen voor x deelnames. Zo kun je een afbeelding over de media heen leggen, bijvoorbeeld een kroontje of medaille. Daarmee wordt het op de site voor iedereen zichtbaar dat iemand al meerdere keren heeft meegedaan! Zie ook het supportartikel Badges voor enkele voorbeelden.

Wil je gebruik maken van de retentie functionaliteit? Geef even aan seintje via support@kentaa.nl of een chatbericht, dan zetten wij het graag voor je aan en kun je daarna zelf per niveau de edities instellen.
 Ook interessant
Inschrijfgeld
Bij de aanmelding van een deelnemer/actiestarter is het mogelijk om inschrijfgeld te vragen. Het inschrijven voor het evenement en het opmaken van de persoonlijke actiepagina is dan één geïntegreerd proces.Het inschrijfgeld dient altijd betaald te worden bij het aanmaken van een actie, ongeacht of je je aanmeldt als lid van een team of als een individuele deelnemer. Inschrijfgeld is op meerdere niveau's toe te voegen en 'druppelt' door naar beneden. Wanneer op website-niveau inschrijfgeld wordt toegevoegd, krijgen eventuele segmenten en projecten ditzelfde inschrijfgeld mee. Vervolgens is het mogelijk om het inschrijfgeld te overschrijven indien er een afwijkende waarde op het betreffende niveau is. Het is mogelijk om meerdere inschrijfgeld-opties (met verschillende bedragen) toe te voegen.Deelnemers kunnen zelf bepalen hoe ze ingeschreven willen worden. Dit kan bijvoorbeeld handig zijn bij:Verschillende afstanden met een verschillend starttarief;Leeftijdsgroepen waarbij kinderen een gereduceerd tarief betalen;Naast het reguliere inschrijftarief een 2e tarief bieden waarbij een T-shirt van het evenement wordt aangeboden.Inhoud:Inschrijfgeld toevoegenInschrijfgeld wijzigenGekozen inschrijfgeld inzienInschrijfgeld toevoegenInstellingen ⟶ InschrijfgeldMet de knop Inschrijfgeld toevoegen kun je de optie(s) toevoegen, waarbij een titel en bedrag wordt gevraagd. Hiernaast wordt gevraagd of het betaalde inschrijfgeld meegenomen moet worden in de tellerstand op de website. Meestal is het inschrijfgeld bedoeld om de onkosten te vergoeden en wordt het niet meegenomen (als donatiegeld) in de tellerstand, maar dit kan natuurlijk variëren.Inschrijfgeld wijzigenInstellingen ⟶ InschrijfgeldDoor op de Wijzigen-knop te klikken is het mogelijk de titel en het bedrag van de optie aan te passen. Dit kan handig zijn bij het aanbieden van een early bird-optie, waarbij het bedrag na verloop van tijd wordt verhoogd. Gekozen inschrijfgeld inzien- De actievoerder zelf en de sitebeheerder kunnen door de actie te beheren onder Mijn inschrijving terugzien welk inschrijfgeld de actievoerder heeft betaald. Daarnaast is de inschrijfgeld-keuze in te zien in de exports van de deelnemers. - Op de actiepagina staat het gekozen inschrijfgeld altijd weergegeven. Dit is een vast element van de pagina en is niet te verbergen. Wanneer de titel van het inschrijfgeld simpelweg "Inschrijfgeld" is, wordt deze niet weergegeven.- Inschrijfgeld komt terug in de Excel-export van alle actiestarters en van de donaties.
Ticketing
e-Ticketing is een premiumfunctionaliteit (dus niet voor iRaiser Go klanten) die wij op verzoek aan kunnen zetten. Voor acties en deelnemers kun je tickets genereren en automatisch laten mailen. De tickets zijn voorzien van een QR-code en die kun je uiteindelijk via je mobiel, webcam of handmatig afscannen.Inhoud artikelVideo met uitlegKenmerkenInstellen E-ticketsE-tickets gebruiken direct onder deze paginaDeel e-tickets met de koperScannen van ticketsWie kunnen er allemaal scannen?ScannerScanner toevoegenMailsHandmatig scannenScannen via de camera Zie hier ook de uitleg zoals gegeven op de Kentaa Academy van 14 april 2022<span class="fr-mk" style="display: none;"> </span>En het filmpje over de update op 12 augustus (toevoeging scanners):<span class="fr-mk" style="display: none;"> </span>KenmerkenJe kunt tickets instellen per niveau, los van elkaarAls de tickets gedeeld zijn kunnen actiestarters deze ook terugvinden in hun dashboard onder "mijn inschrijving".Als je meerdere deelnemers toevoegt onder hetzelfde e-mailadres krijg je in meerdere tickets binnen (Op dit moment in meerdere mails, maar dat gaan we aanpassen naar een mail met meerdere pdf’s)Je kunt ervoor kiezen de tickets al wel te genereren, maar nog niet te delen (en dit op een later moment pas te doen) Instellen e-ticketsHet instellen van e-tickets kun je per niveau doen. Je kunt ervoor kiezen dit op websiteniveau te doen (voor inschrijvingen die direct onder websiteniveau gaan), voor een specifiek segment (voor inschrijvingen die direct op dat niveau gaan) of voor inschrijvingen onder een project. Je doet dit door naar Instellingen > E-tickets te gaan. Hier heb je twee opties: E-tickets gebruiken direct onder deze pagina.Als je deze gebruikt dan worden er e-tickets gegenereerd. Je ziet de e-tickets dan alleen nog via E-tickets > Overzicht. Er gebeurt verder niets en actiestarters zien de tickets ook nog niet. Je kunt nog geen pdf-bestanden downloaden, maar kunt al wel de ticketnummers zien.Deel e-tickets met de koperPas op het moment dat je op "Deel e-tickets met de koper." klikt dan kunnen actiestarters hun tickets zien in het dashboard (voorbeeld ticket). Bestaande acties of deelnemers op dat niveau krijgen direct de mail onder Actiestarters > E-tickets opsturen toegestuurd. Nieuwe deelnemers krijgen bij het aanmaken van een actie hun ticket direct toegestuurd. Die mail ziet er default zo uit, maar kun je aanpassen. Scannen van ticketsJe kunt de e-tickets handmatig of via een camera scannen. Als je op hoofdniveau naar E-tickets > Overzicht (handmatig) of naar E-tickets > Scannen gaan. Dan zie je alle tickets van de gehele site (inclusief alle onderliggende segmenten en projecten), en kun je die ook allemaal scannen. Je kunt ook specifiek naar bijvoorbeeld een project gaan en daar kun je alleen tickets scannen die onder dat project vallen.Wie kunnen er allemaal scannen?SitebeheerdersKunnen e-tickets instellen, naar het overzicht gaan en scannen (en exports maken). Als je als sitebeheerder op het hoogste niveau gaat scannen, dan scan je ook meteen voor alle onderliggende projecten. Je kunt het zien als een soort 'superscanner'SegmentbeheerdersKunnen naar het overzicht gaan en scannen (en exports maken)ProjectbeheerdersKunnen naar het overzicht gaan en scannen (en exports maken)Scanner (zie volgende kopje)Scanners kunnen alleen tickets scannen voor de entiteiten (websiteniveau, segment, project) waar die aan toe zijn gevoegd. ScannerAls reguliere scanner kun je ook op websiteniveau toe worden gevoegd. Echter dan kun je alleen dat niveau scannen, niet bijvoorbeeld onderliggen segmenten of projecten (tenzij je daar specifiek ook nog aan toe wordt gevoegd). Scanner toevoegenJe kunt per niveau een scanner toevoegen. Deze is gekoppeld aan een gebruiker. Je kunt een gebruiker hebben die alleen kan scannen. Die komt dan vervolgens ook helemaal niet in het dashboard, maar direct in een scanmenu. Handig als je bijvoorbeeld bij een event wat vrijwilligers hebt die je helpen met scannen!Je kunt een scanner toevoegen door naar E-tickets > Scanners te gaanHier voeg je iemand toe door op deze plek een account aan te maken. Als iemand nog niet bekend is dan wordt er een nieuwe gebruiker aangemaakt en ontvangt deze twee mails: Een om zijn wachtwoord mee in te stellen en een om aan te geven dat hij/zij toegevoegd is als scanner.MailsDe mail die een scanner ontvangt ziet er zo uit:Je kunt deze aanpassen via E-mails > Overzicht Mails > Scanners > Welkomstmail scanner:Je ziet deze mail alleen als op dat niveau e-tickets gebruikt worden!Iemand die al wel een gebruiker in het systeem is kun je ook toevoegen als scanner van een bepaald project (of segment of websiteniveau). Bijvoorbeeld een actiestarter die wilt helpen met scannen. Je krijgt dan deze melding te zien:Na het opslaan kan deze actiestarter dan ook tickets scannen voor dat niveau. Als iemand die een actie start heeft ook een scanner is en inlogt in het dashboard dan komt hij in het dashboard van zijn actie. Hij kan dan naar het scannen gaan door op dit icoontje te klikken: Er zijn twee manieren om daadwerkelijk te scannen: handmatig en via een cameraHandmatig scannenAls je naar het overzicht van tickets gaat via E-tickets > Overzicht dan kun je daar handmatig mensen als aanwezig zetten. Je doet dit door op de drie puntjes achter de actie/deelnemer te klikken en deze te markeren als aanwezig. Elk ticket is voorzien van een Ticketnummer. Daar kun je ook op zoeken in het zoekveld.Mochten er internetproblemen zijn dan kun je ook werken met een offline variant door van tevoren een download te maken van alle tickets. Daar staat dan in:Aangemaakt op || E-ticketnummer || Naam || Titel || Gescanned op || Gescanned doorJe kunt dan handmatig de ticketnummers zoeken en afvinken.Scannen via de cameraAls je naar E-tickets > Scannen gaat dan wordt er automatisch verbinding geprobeerd te maken met je webcam (computer) of je camera (mobiel). Nadat je die toestemming hebt gegeven kun je de QR-code scannen. Als je een code scant die ongeldig is dan krijg je een rode melding.Het venster om te scannen ziet er zo uit: (waarbij een scanner hier direct in terecht komt en dus niet eerst in een dashboard landt)Hier kun je een camera selecteren en daarna een ticket scannen. Dat kan bijvoorbeeld een camera van je mobiel zijn, maar ook een webcam als je op je pc werkt.Een scanner kan ook handmatig een code invoeren Je houdt de QR-qode voor de webcamNa een succesvolle scan zie je direct de info (onderaan zie je extra vragen, activiteiten, eventuele webshopartikelen en contactgegevens) Bij een ongeldige QR-code (met een verkeerde link) zie je dit:Als een ticket al gescand is ziet het er zo uit:
Wijzigingen AVG
De volgende wijzigingen zijn op 20 oktober 2022 (Kentaa Premium en Kentaa Forms) en op 18 oktober 2022 (Digicollect) live gegaan: (Update: op 20 juni 2023 zijn er nog enkele aanpassingen live gegaan. Zie punt vier van dit artikel)Inhoud:Kentaa PremiumAlgemene voorwaarden en privacyOpt-ins zijn soft opt-ins gewordenOp de hoogte houdenBij het invullen van je telefoonnummerNieuwsbriefAangeven of gegevens gedeeld mogen wordenUpdate 20 juni 2023: Aanpassing in tonen naam donateurDigicollectAlgemene voorwaarden en privacyOpt-ins zijn soft opt-ins gewordenMobiel nummerNieuwsbriefAangeven of gegevens gedeeld mogen wordenKentaa Premium (incl. Kentaa Forms):In de Academy van 20-01-2022 werden de wijzigingen besproken:Kentaa Academy 20-01-20220:00 Introductie 1:32 A/B testing van donatiebedragen12:17 A/B testing samenvatting en vragen16:01 Badges voor actiestarters 20:12 Badges samenvatting en vragen26:54 Nieuwe SUMO34:37 SUMO samenvatting 37:50 Consentregistratie voor de telecomwet*43:50 Consentregistratie samenvatting en vragen 1. Algemene voorwaarden en privacyVolgens de Autoriteit Consument & Markt zijn de algemene voorwaarden geldig als de consument weet dat deze van toepassing zijn op het moment dat hij of zij de dienst bij jou afneemt. Je moet de algemene voorwaarden dus ter beschikking stellen en klikbaar maken in de aanmeld- en donatieflow. - BronBij het aanmaken van een actie én bij het doen van een donatie hoeft de gebruiker dus geen akkoord meer te geven op de algemene voorwaarden. Je gaat hier automatisch akkoord mee bij het doen van de donatie of als je verder gaat in de flow:Omdat je nu ook automatisch akkoord bent met de privacyverklaring hebben we dit ook aan de api toegevoegd. Dit wordt bij nieuw aangemaakte acties na 20 oktober automatisch opgeslagen als consent. Voor oude actiestarters / donateurs wordt deze data niet met terugwerkende kracht opgeslagen.2. Opt-ins zijn soft opt-ins gewordenNormaliter moet een consument een actieve opt-in geven op het moment dat hij of zij een nieuwsbrief wil ontvangen of om telefonisch benaderd te worden. De uitzondering op deze regel is het begrip 'klantrelatie'. Sinds 1 juli 2021 is het begrip 'klantrelatie' verruimd voor goede doelen. Naast een financiële transactie, wordt ook een vrijwilliger en deelnemer van een manifestatie gerekend onder een klantrelatie. Oftewel iemand die voor jou in actie komt, mag gezien worden als een klantrelatie. Voor een donateur was dit al het geval, omdat zij een financiële transactie voltooiden. - BronWe hebben diverse opt-ins om bovenstaande reden vervangen voor soft opt-ins. Waar je eerder zelf aan moest vinken dat je bijvoorbeeld op de hoogte wil worden gehouden van nieuws, staat dit vinkje nu al standaard aan. Dit geldt ook voor de twee verschillende vinkjes gericht op telefonisch benaderen. Hier is het goed om te weten dat jullie als klant deze consentteksten zelf aan kunnen passen in het dashboard. We hebben het vinkje default aangezet op deze plekken:Op de hoogte houdenDit zie je na het doen van een donatie:b. Bij het invullen van je telefoonnummer in de aanmeldflow of bij het donerenHet tweede vinkje over marketingdoeleinden kunnen we op verzoek van jullie aanzetten.c. Nieuwsbrief (bij doneren)3. Aangeven of gegevens gedeeld mogen wordenDe contactgegevens werden (op het moment dat die werden ingevuld door de donateur) gedeeld met de actiestarter. Omdat dit niet altijd wenselijk is, hebben wij ervoor gekozen om een extra soft opt-in toe te voegen bij het doen van een donatie aan een actie, team, bedrijf op project:Je kunt er als donateur voor kiezen de gegevens niet te delen met de initiatiefnemer van de actie. Dat kan zijn:De actiestarterDe teamcaptainDe bedrijfsbeheerderDe projectbeheerderAls je dit vinkje (dat standaard aan staat) uitzet dan worden die gegevens niet gedeeld met de actiestarter. Die ziet deze als Anoniem terug:In het Excel-bestand is er een extra kolom bijgekomen, helemaal achteraan, met 'contactgegevens delen':Jullie als sitebeheerders kunnen deze gegevens nog wel bekijken.4. Update 20 juni 2023: Aanpassing in tonen voornaam donateurSinds 20 juni 2023 is er een wijziging live gegaan die betrekking heeft op het volgende scenario:- Je doet een donatie en kiest bij het doneren ervoor om je gegevens niet te delen met de initiatiefnemer.Eerder werd de naam aan de voorkant dan altijd als anoniem getoond. Met de logica dat het vreemd is om je gegevens niet te delen met de initiatiefnemer van de actie, maar dat deze aan de voorkant dan alsnog kon zien wie gedoneerd had.We merkten echter dat het veel vragen en verwarring opleverde bij donateurs. Vooral omdat ze in de veronderstelling waren dat het tonen van de naam alleen gekoppeld was aan het vinkje "Mijn naam afschermen op de website. "We hebben dat tonen van de naam nu alleen afhankelijk gemaakt van de optie "Mijn naam afschermen op de website." Als dat vinkje niet aan is aangezet, zie je op de website de naam van de donateur staan.Om het te verduidelijken hebben we de tekst bij het delen met de initiatiefnemer nu aangepast naar: "Mijn contactgegevens delen met de initiatiefnemer van deze actie, zodat deze mij bijvoorbeeld een bedankje mag sturen."We hopen dat dit het voor de donateur een stuk duidelijker maakt. Dit is een wijziging die per 20 juni in is gegaan. Voor oudere donaties geldt dat deze niet met terugwerkende kracht zichtbaar zijn gemaakt. In het geval je een oude donatie had waarbij aangegeven was dat de gegevens niet gedeeld mochten worden met de initiatiefnemer, daarbij is nu bij elke oude donatie het vinkje bij naam afschermen aangezet. Mocht je een donateur hebben die dit wel getoond wilde hebben dan kun je dat nu aanpassen in het systeem door de donatie op te zoeken en het vinkje op 'niet verbergen' te zetten.DigicollectIn de academy van 6-10 werden de wijzigingen besproken:Digicollect Academy 06-10-202202:45 - Poules 23:45 - Recente updates 30:00 - AVG wijzigingen 35:04 - Digicollect actiemaand 1. Algemene voorwaarden en privacyVolgens de Autoriteit Consument & Markt zijn de algemene voorwaarden geldig als de consument weet dat deze van toepassing zijn op het moment dat hij of zij de dienst bij jou afneemt. Je moet de algemene voorwaarden dus ter beschikking stellen en klikbaar maken in de aanmeld- en donatieflow. - BronBij het aanmaken van een collectebus én bij het doen van een donatie hoeft de gebruiker dus geen akkoord meer te geven op de algemene voorwaarden. Je gaat hier automatisch akkoord mee bij het doen van de donatie of als je verder gaat in de flow:2. Opt-ins zijn soft opt-ins outs gewordenNormaliter moet een consument een actieve opt-in geven op het moment dat hij of zij een nieuwsbrief wil ontvangen of om telefonisch benaderd te worden. De uitzondering op deze regel is het begrip 'klantrelatie'. Sinds 1 juli 2021 is het begrip 'klantrelatie' verruimd voor goede doelen. Naast een financiële transactie, wordt ook een vrijwilliger en deelnemer van een manifestatie gerekend onder een klantrelatie. Oftewel iemand die voor jou in actie komt, mag gezien worden als een klantrelatie. Voor een donateur was dit al het geval, omdat zij een financiële transactie voltooiden. - BronWe hebben diverse opt-ins om bovenstaande reden vervangen voor soft opt-ins. Waar je eerder zelf aan moest vinken dat je bijvoorbeeld op de hoogte wil worden gehouden van nieuws, staat dit vinkje nu al standaard aan. Dit geldt ook voor de twee verschillende vinkjes gericht op telefonisch benaderen. Hier is het goed om te weten dat jullie als klant deze consentteksten zelf aan kunnen passen in het dashboard.We hebben het vinkje default aangezet op deze plekken:Bij het invullen van het mobiele nummerBij het aanmaken van een collectebus, als je een telefoonnummer invult staan beide vinkjes voor benaderen voor tips of marketingdoeleinden standaard aan. De functionaliteit om het tweede vinkje te tonen kunnen wij voor je aanzetten:NieuwsbriefBij het doneren, als je je e-mailadres achterlaat staat dan staat de opt-in voor de nieuwsbrief ook al automatisch aan: 3. Aangeven of gegevens gedeeld mogen wordenDe contactgegevens werden (op het moment dat die werden ingevuld door de donateur) gedeeld met de collectant. Omdat dit niet altijd wenselijk is, hebben wij ervoor gekozen om een extra soft opt-in toe te voegen bij het doen van een donatie: 'Mijn contactgegevens mogen gedeeld worden met de collectant.' :Als je dit vinkje (dat standaard aan staat) uitzet dan worden die gegevens niet gedeeld met de collectant. Die ziet deze als Anoniem in de automatische e-mails:In het overzicht van donateurs dat een collectant in kan zien is de donatie ook als anoniem te zien:Jullie als sitebeheerders kunnen deze gegevens nog wel bekijken.
Webshop
Als je meer wilt weten over de functie voor het aanmaken van e-tickets via de webshop, klik dan hier.Als je wilt weten hoe je artikelen ter verkoop kunt aanbieden, lees dan verder in dit artikel.Wil je graag een T-shirt, medaille of een andere goodie aanbieden aan iedereen die een actie start op jullie website? Dat kan met de webshop-functie binnen het platform. Met deze functie is het mogelijk om producten en zelfs diensten aan te bieden aan iedereen die een actie aanmaakt op de website (met uitzondering van bedrijfsleden). De webshop staat niet standaard aan op de website, deze kan door een supportmedewerker aangezet worden op de website. Neem hiervoor contact op met support-nl@iraiser.eu. Hierna is het zaak dat de producten worden toegevoegd aan de catalogus. Zodra de producten in de catalogus zijn gezet, kan de actiestarter dit gelijk zien en direct bestellen in de actiestartflow!Maar wat nou als deze producten alleen voor een specifiek segment of project gelden? Geen probleem! Het is namelijk mogelijk om een catalogus op segment- of projectniveau in te richten. Deze catalogus zal dan alleen zichtbaar zijn voor de actievoerders op dit niveau. Andersom is het ook mogelijk om op het hoofdniveau een catalogus op te stellen, waarna je deze op een onderliggend segment of project uitschakelt.Webshop-artikelen toevoegenAdministratie ⟶ Webshop-catalogusKlik op Ja, er is een webshop-catalogus om webshop-artikelen toe te voegenKlik op Product toevoegenVul een titel in (verplicht)Vul een bedrag in (verplicht)Evt.: upload een afbeelding van het productEvt. voeg meerdere varianten toe (bijv. S, M, L, XL, XXL)Klik op OpslaanLet op: Het uitvinken van Ja, er is een webshop-catalogus schakelt de webshop uit maar verwijdert de producten niet. Webshop-bestellingen inzienAdministratie ⟶ Webshop-bestellingenOp deze pagina is een overzicht van alle webshop-bestellingen te zienKlik op het blauwe oog-icoon om details van een bestelling in te zien NabestellingenStandaard staat de mogelijkheid tot het doen van een nabestelling over het gehele platform aan. Dat wil zeggen dat als er een mogelijkheid is om webshop-items te bestellen, actiestarter dit ook achteraf vanuit hun dashboard kunnen doen. Het is ook mogelijk het doen van nabestellingen over het gehele platform uit te zetten.Een ingelogde actiestarter (of deelnemer) kan via 'Webshop' de nabestelling selecteren.En dan komt er een bestelmenu tevoorschijn waarin ook direct afgerekend kan worden.Het nabestellen kan onbeperkt gebeuren zolang er items in de webshop-catalogus staan.Er is een mail gekoppeld aan nabestellingen. Deze staat onder de categorie Actiestarters (en ook deelnemers) en heet 'Bedankmail voor nabestellingen'. Hierin staat een betaalbewijs van het webshop-item. Deze wordt ook gestuurd als het een gratis webshop-item is. Na het bestellen komen alle bestellingen onder het overzicht te staan onder 'Mijn inschrijving'.
Webshop e-tickets
Ticketing via de webshop ("Ticketing")Organiseer je een evenement waarvoor je tickets nodig hebt? Dan kan de ticketingfunctie van onze webshop de perfecte oplossing zijn. Met deze functie kun je automatisch tickets aanmaken voor je campagne, zodat je klaar bent voor je evenement.Functies:Met deze functie kun je:Wisselende tickettypen aanmaken op basis van kosten.De gegevens van de persoon die de tickets koopt registreren, ook voor toekomstige communicatie.De beschikbaarheid van tickets beheren en ook het maximum aantal tickets dat een koper kan kopen (dit kunnen er meerdere zijn als dat nodig is). Volg tijdens het evenement eenvoudig wie er aanwezig is en rapporteer de uiteindelijke opkomst van het evenement met één klik.Tickets scannen tijdens het evenement en ook vrijwilligers toevoegen die kunnen helpen met scannenLaten we de stappen doorlopen om deze functie te activeren:E-tickets inschakelen met de webshopControleer eerst of de functies "E-tickets" en "Webshop" zijn ingeschakeld in de linkerbalk van je platform.Controleer vervolgens of het mogelijk is om het aanmaken van de actiepagina uit te schakelen onder Instellingen → ActiepaginaAls dit niet mogelijk is, neem dan contact op met iRaiser support. Wij zullen controleren of de functie is opgenomen in je abonnement en deze vervolgens voor je activeren.Maak je ticket(s) aanOm een ticket item toe te voegen, ga je naar Dashboard > Webshop > Catalogus. Schakel daar de webshop in, voeg een nieuw item toe en selecteer de optie 'ticket'. Vervolgens kun je het ticket een naam en een bedrag geven. Als het een gratis ticket is, vul je simpelweg "0" in.Daarnaast kun je de beschikbaarheid aangeven en een bestellimiet instellen. Zo houd je controle over het aantal beschikbare tickets. Je kunt bijvoorbeeld een ticket maken met 250 beschikbare plaatsen en toestaan dat een enkele koper er slechts vier kan bestellen.Je kunt natuurlijk meer dan één soort ticket maken, met verschillende beschikbaarheids- en bestellimieten voor elk.We raden ook aan om een afbeelding toe te voegen; dit maakt het ticket herkenbaar in de aanmeldflow. Als een ticket is uitverkocht, wordt het grijs weergegeven. Als het het enige type ticket is dat beschikbaar is, verdwijnt het helemaal uit de aanmeldflow.Vergeet niet te controleren waar de tickets beschikbaar zijn voor kopers. Als je een ticket aanmaakt op websiteniveau en het beschikbaar maakt in een project, kan dat ticket op beide lagen worden verkocht. De beschikbaarheid wordt door beide beïnvloed: als er 100 tickets beschikbaar zijn en er wordt er een gekocht op de website- of projectlaag, dan zullen er 99 tickets beschikbaar zijn voor de volgende aankoop, ongeacht of dit op de website of in het project gebeurt.De "aanmeldflow" instellenDe aanmeldflow is het proces dat iemand doorloopt om zich te registreren op het platform. In dit geval is dat voor het kopen van tickets. Laten we eens kijken hoe we een eenvoudige aanmeldflow kunnen maken voor het kopen van tickets.Zet "Maak een fondsenwervingspagina aan" uitOp het Community Fundraising Platform wordt de persoon die zich registreert standaard gevraagd om een fondsenwervingspagina aan te maken. Voor ticketaankopen willen we misschien niet dat ze een pagina aanmaken, dus moeten we naar Instellingen → actiepagina gaan en dan "uit" selecteren.De "Startdonatie" uitschakelen (of niet)Tijdens de aanmeldflow kun je mensen vragen om een extra, optionele donatie te doen. Als je deze stap niet wilt toevoegen om de aankoop van een ticket nog eenvoudiger te maken, ga dan naar Instellingen → Startdonatie en vink je die optie uit.De aanmeldflow aanpassenHet is tijd om de stappen van het registratieproces te beheren. Ga naar Instellingen → Aanmeldflow.Als je website verschillende aanmeldmogelijkheden heeft (individueel, team, etc.), kun je deze uitschakelen voor deze laag waar je tickets wilt verkopen. We stellen ook voor om als eerste stap "webshop tonen" te kiezen, zodat de beschikbare tickets als eerste worden getoond, nog voordat er om registratiegegevens wordt gevraagd.Je kunt dan de tekst aanpassen die in elke stap van de flow aan de linkerkant wordt getoond: klik op het tweede tabblad, "Aanmeldflow", en vervolgens op "edit" bij de stap die je wilt aanpassen.Vergeet niet dat je ook de "Bedankpagina" kunt aanpassen, dit is de pagina die wordt weergegeven nadat er tickets zijn gekocht. Je kunt tekst toevoegen om de koper gerust te stellen en enthousiast te maken voor het evenement. Bijvoorbeeld: "Bedankt voor het kopen van uw tickets! Je vindt ze binnen een paar minuten in je e-mail. We kijken ernaar uit om je op het evenement te zien!"In het laatste tabblad, "Teksten", kun je de start actie knop aanpassen met een meer evenementgerelateerde oproep tot actie, zoals "Reserveer je plaats" of "Koop tickets".E-mailsZodra een klant tickets koopt, zullen ze gerelateerde e-mails ontvangen. De belangrijkste e-mail bevat de PDF van de tickets, met één PDF per ticket.Een enkel ticket ziet er zo uit:Opmerking:De tijd die het kost om ze te genereren is evenredig met het aantal tickets. Als er maar één ticket moet worden aangemaakt, duurt het een paar seconden. Als er 10 tickets gegenereerd moeten worden, zal het verzenden van de e-mail iets langer duren.Er zijn drie e-mails waar je rekening mee moet houden als je het ticketingsysteem inschakelt:"Nieuw wachtwoord instellen": Dit is de standaard e-mail die wordt verzonden naar elke nieuwe gebruiker die een account aanmaakt op het platform.In de e-mailsectie van de laag waar je de tickets hebt aangemaakt, vind je vervolgens de sectie "deelnemer".Hier kun je eventueel aanpassingen maken:Welkomstmail na aanmelden deelnemer: Dit is de e-mail die de koper ontvangt vlak nadat hij/zij zich heeft aangemeld voor het evenement. Bedank mail voor bestelling van webshop ticket(s): Dit is de e-mail met de verschillende tickets als bijlage. Als de koper nieuwe tickets koopt, ontvangt hij/zij nog zo'n e-mail met de nieuwe tickets.Aanwezigheid bij evenementen beherenZodra het evenement begint, wil je misschien de aanwezigen beheren. Elk ticket heeft een QR-code en een unieke code.Door te klikken op E-tickets → E-tickets webshop → Overzicht, vind je de volledige lijst van alle gegenereerde tickets. Je kunt ze zoeken op naam van de koper of op ticketnummer.Je kunt zelfs de QR-code scannen met je camera (door op het pictogram in de rechterbovenhoek van de pagina te klikken), of scanners aanmaken. Dat zijn specifieke gebruikers die alleen de tickets mogen scannen (ze kunnen geen gegevens downloaden, ze kunnen de inhoud niet wijzigen...). Afhankelijk van het niveau dat je hebt toegevoegd, kunnen ze tickets van dat niveau scannen. Als je bijvoorbeeld een scanner toevoegt aan een specifiek project, kan hij alleen tickets van dat project scannen.Verschillen tussen tickets van deelnemers en tickets uit de webshopIn het Community Fundraising Platform kun je nog een andere manier tegenkomen om tickets te genereren: "deelnemers tickets".Beide typen leveren een PDF ticket met een scanbare code, maar er zijn enkele verschillen in hoe ze gebruikt kunnen worden.Deelnemerstickets zijn voornamelijk ontworpen voor evenementen waar individuen worden gevraagd (of aangemoedigd) om een fondsenwervingspagina op te zetten en zich voornamelijk zelf registreren. Marathons of andere sportevenementen zijn hier goede voorbeelden van. Als iemand meer dan één persoon wil registreren, moet hij het registratieproces voor elke persoon afzonderlijk doorlopen. Het ticket kan naar de koper worden gestuurd op een ander tijdstip dan waarop het is gekocht.Webshop Tickets daarentegen zijn bedoeld voor evenementen waarbij de nadruk ligt op het bijwonen van het evenement zelf. De koper kan meerdere tickets in één transactie kopen en het registratieproces kan aanzienlijk worden vereenvoudigd door het ticket als eerste stap aan te bieden en stappen zoals het maken van een fondsenwervingspagina te verwijderen. Tickets worden direct na aankoop verstuurd.Als u een conferentie, een gala-avond of een concert organiseert, zijn webshop tickets de ideale keuze.
Activiteiten
Met de activiteiten-module kan in de aanmeldflow een (verplichte) keuzevraag toegevoegd worden. Denk hierbij een lijst van afstanden of aanmeldopties waaruit de actiestarter moet kiezen, of de vraag om wat voor soort actie het gaat.Inhoud:1. Activiteiten toevoegen2. Activiteiten selecteren en gebruiken3. Gekozen activiteit wel/niet tonen 1. Activiteiten toevoegenInstellingen ⟶ Activiteiten lijstVoordat je begint zul je eerst de activiteiten aan de algehele lijst van activiteiten moeten toevoegen. Zie dit als een soort bibliotheek waar alle activiteiten staan opgenomen en je per site, segment of project kunt kiezen welke van die activiteiten je wilt gebruiken.2. Activiteiten selecteren en gebruikenOp siteniveau, per segment en per project kun je de activiteiten configureren voor gebruik. Dit configureren bestaat uit 2 delen: Activiteiten selecteren en Activiteiten gebruiken.2.1 Activiteiten selecterenInstellingen ⟶ ActiviteitenHet eerste deel bestaat uit het kiezen van de activiteiten waaruit de actiestarter kan kiezen. Op siteniveau kun je hierbij kiezen uit de volledige lijst aan activiteiten. Op segment- en projectniveau kan een uitgedunde lijst zichtbaar zijn, afhankelijk van onderstaande configuratie. Ook kan per gekozen activiteit een maximum aantal deelnemers worden opgegeven.2.2 Activiteiten gebruikenInstellingen ⟶ ActiviteitenBij het kopje Activiteiten gebruiken bepaal je hoe de activiteiten worden ingezet. Eerst bepaal je hoe de activiteiten zich dienen te gedragen op Deze pagina. Daarna bepaal je het voor Onderliggende niveau's.Voorbeeld: op het siteniveau kan men een algemene actie starten en hoeft er geen activiteit gekozen te worden, dan wordt er op Deze pagina "Nee, er hoeft geen.." geselecteerd te worden. Als men op onderliggende projecten wél een activiteit moet kiezen, wordt er bij Onderliggende niveau's gekozen voor één van de "Ja"-opties. Beide Ja-opties bepalen dat er een activiteit gekozen moet worden op deze onderliggende projecten en kan er nog gekozen worden welke set van activiteiten getoond wordt aan de actiestarter.Hier bepaal je of actiestarters onder het huidige niveau een activiteit moeten kiezen.Je kunt ervoor kiezen aan te vinken dat de Actiestarters zelf hun activiteit kunnen wijzigen. Ze kunnen deze dan aanpassen onder mijn inschrijving. Dit kan alleen als er plek vrij is bij de nieuwe activiteit. Op het moment dat de activiteit gewijzigd is dan wordt de oude activiteit weer vrijgegeven.Vervolgens kies je hier wat actiestarters op de onderliggende niveau's (segmenten en/of projecten) krijgen te zien.Voorbeeldscenario - Je neemt het evenement Dam tot Damloop op in de website en men kan zich hiervoor inschrijven op 2 afstanden: de halve en hele marathon. Deze 2 afstanden neem je op als activiteiten in de Activiteiten lijst (op website-niveau). Vervolgens beheer je de Dam tot Damloop, ga je naar Instellingen > Activiteiten en vink je de 2 afstanden aan. Je geeft hierbij aan dat alle acties direct onder deze pagina verplicht een activiteit dienen te kiezen. Je zet aan dat Actiestarters zelf hun activiteit mogen wijzigen. Twee weken voordat het evenement is zet je de optie uit dat men zelf hun activiteit mag wijzigen.3. Gekozen activiteit wel/niet tonenDe gekozen activiteit wordt op verscheidene plekken weergegeven. Je kunt zelf kiezen of dit wenselijk is, of niet. Het gaat om de volgende plekken:Op de teampagina / in de aanmeldflowZodra een teamcaptain zelf een activiteit heeft gekozen, wordt deze op de teampagina weergegeven. Ook wordt deze in de aanmeldflow weergegeven, zodra een actiestarter lid wilt worden van het team. Bij de stap om de activiteit te kiezen, wordt weergegeven welke activiteit door de teamcaptain is gekozen om de keus zo makkelijker te maken.Deze optie is uit te zetten bij het inregelen van de activiteiten, via Instellingen > Activiteiten.Op de actiepaginaOok individuele actiestarters laten automatisch op hun actiepagina zien welke activiteit ze hebben gekozen. Is dit niet geheel van toepassing? Laat het een Kentaa-medewerker weten en we maken deze keuze over de gehele website onzichtbaar op de actiepagina.
Teampagina
Je kunt je inschrijven als individu, maar kunt ook een team starten of lid worden van een bestaand team. Als team heb je een eigen teampagina, waar je meer informatie over het team ziet en kunt inzien wie de teamleden zijn. Hier kun je als teamcaptain nieuwsberichten toevoegen en de teampagina bewerken. Bekijk hier het filmpje over het beheren van teams, of lees hieronder verder over specifieke onderdelen.00:00 - Welkom00:29 - Overview en download team01:23 - Pas een team aan02:38 - Handmatig een team aanmaken03:42 - Teamleden aanmaken04:12 - Teamcaptain aanstellen05:20 - Team verplaatsen05:49 - Andere opties Inhoud artikelTeamcaptainContentInstellingenDonatiesTeamledenBeheer teamTeamcaptain veranderenTeamleden toevoegen aan een teamTeamleden verwijderenEen team toevoegen via het dashboardEen team starten als actiestarter na aanmeldingCap op aantal teamleden TeamcaptainDe teamcaptain is degene die het team gemaakt heeft en daarmee degene die het beheer over het team heeft. De teamcaptain kan het volgende doen:ContentWijzigen teamnaam, profielfoto, titel en teamomschrijving (Content > Motivatie)Toevoegen afbeelding of video aan teampagina (Content > Foto's en video's)Toevoegen sponsorlogo's (Content > Sponsorlogo's)Toevoegen nieuwsberichten (Content > Blog)InstellingenTeamleden toestaan (Instellingen > Teamleden toestaan)Hier kan de teamcaptain kiezen voor onbeperkt aantal leden toestaan, een bepaald aantal teamleden toestaan (let op: als er een activiteit gekozen moet worden dan is deze optie er niet), of geen teamleden meer toestaanTeam sluiten (Instellingen > Pagina sluiten)Instellen streefbedrag team (Instellingen > Streefbedrag)DonatiesDe teamcaptain kan alle donaties die op teamleden gedaan zijn inzien door op de 'i' achter de donatie te klikken. TeamledenEen teamcaptain kan actievoerders verwijderen uit zijn of haar team. Dit kan bij de overzichtspagina teamleden, door op de drie puntjes achter een van de teamleden te klikken en te kiezen voor 'Verwijder uit team'. Ook kan een teamcaptain meer informatie over de acties van de teamleden zien door op de 'i' onder de drie puntjes te klikken. Beheer teamAls sitebeheerder kun je per actie direct zien of deze lid is van een team of niet. Dit zie je door de volgende iconen:ActiestarterTeamlid Teamstarter Teamcaptain veranderenJe kunt de eigenaar van een team aanpassen. Dit doe je door naar teams te gaan en het team op te zoeken. Vervolgens klik je op de drie puntjes achter het team en kies je voor 'gebruiker toewijzen'. Vervolgens selecteer je de nieuwe eigenaar van het team (indien nodig kun je hiervoor eerst een nieuwe gebruiker aanmaken). Teamleden toevoegen aan een teamAls iemand zich in heeft geschreven en daarna erachter komt dat hij of zij liever in een team had gezeten dan kan die persoon achteraf nog een team aanmaken door de actie te beheren en dan naar 'team maken' te gaan. Dan wordt er een team aangemaakt en is die actiestarter hier teamcaptain van.Het toevoegen van een bestaande deelnemer/actievoerder aan een bestaand team is in feite niet meer dan het verplaatsen van deze actie naar het team. Als eerste zoek je de actie op door naar 'Acties' te gaan. Vervolgens klik je op de drie puntjes en selecteer je verplaatsen. Je zoekt het team op en klikt op verplaatsen. Daarna komt de actiepagina onder het team te hangen en is die persoon lid geworden van het team.Teamleden verwijderenEen teamlid is niets meer dan een actiepagina die gekoppeld is aan het team. Als je een teamlid verwijdert, dan is de pagina niet meer gekoppeld aan het team, maar de actiepagina van de verwijderde persoon blifjt gewoonintact. Je kunt een teamlid als volgt verwijderen: Zoek het team op en druk op beheren. Klik vervolgens op Teamleden. Daarna klik je op de drie puntjes achter het teamlid dat je wilt verwijderen en kies je voor verwijder uit team. Een team toevoegen via het dashboardJe kunt ook via de achterkant een team aanmaken. Hiervoor ga je eerst naar de plek waar je het team aan wilt maken. Bijvoorbeeld op siteniveau (als je inschrijvingen op websiteniveau zijn), onder een segment of onder een project. In het geval je het team onder een project toe wilt voegen zoek je eerst het project op en beheer je deze. Daarna ga je naar teams en klik je op team toevoegen. Een team heeft altijd een teamcaptain, dus je kunt deze koppelen aan een bestaande account, of een nieuwe account toevoegen. Nadat het team gekoppeld is aan een account hoef je alleen nog maar de teamnaam, teamtitel en teamomschrijving in te vullen.Een team starten als actiestarter na aanmeldingNa aanmelding van een actie kun je als actiestarter eventueel ook nog een team starten. Dit kan via de knop team starten:Je kunt dan via het dashboard een team aanmaken:Na het invullen van alle informatie (ook bijvoorbeeld extra vragen aan de teamcaptain) wordt het team aangemaakt. De actie waar dit team mee aan is gemaakt wordt dan teamcaptain. Er worden na het aanmaken van het team geen mails gestuurd. Je ziet de knop om het team aan te maken alleen als:Je nog geen team hebtHet mogelijk is om een team te starten (Dus via Instellingen > Aanmeldflow > Aanmeldopties)Het mogelijk is een actie te starten. Dus het actiestarten moet niet geblokkeerd zijn en er moeten nog vrije plekken zijnAlleen sitebeheerders en de actiestarter zelf kunnen dit doen. De knop is niet zichtbaar voor segment- en projectbeheerders.Cap op aantal teamleden Als je een event hebt waarbij je een maximaal aantal teamleden hebt dan kun je dit instellen via Instellingen > Standaard team-instellingen. Alle teams die dan aan worden gemaakt die mogen maximaal dat ingestelde aantal leden hebben. Je kunt via Instellingen > Standaard team-instellingen een maximum instellen via Teamleden limiet:Als je daar kiest voor "Ja, ik wil een limiet opgeven voor teams onder deze pagina." dan kun je daar het maximum aantal teamleden instellen. De actiestarter die zelf ook teamcaptain is telt ook mee als actie. Na het activeren worden eventueel door de teamcaptain ingestelde limieten overschreven. Als je die op een later moment echter weer terugzet dan wordt ook die eerder ingestelde limiet weer teruggezet.Bestaande teams die al meer leden hebben dan je ingestelde maximum blijven wel intact. Stel je hebt een team van 6 man, en je stelt een maximum in over het hele project van 4 mensen per team, dan blijft dat team wel die zes mensen houden. Zorg er daarom voor dat je het voorafgaand al goed hebt ingesteld. Dit kan een sitebeheerder, segmentbeheerder en projectbeheerder doen.De optie 'teamleden toestaan' verdwijnt op het moment dat je een maximaal aantal teamleden instelt over een bepaald niveau. Een teamcaptain kan dus dus niet meer zelf het maximum instellenJe kunt de cap op siteniveau, segmentniveau en projectniveau instellen en er zit geen erving in (het is dus alleen voor dat niveau).
Inschrijven als bedrijf
Met de bedijfsaanmelding kan men in één keer voor meerdere collega's plekken reserveren en afrekenen voor een evenement.De standaardopties voor het aanmelden voor een evenement zijn:-individu-team-teamlidMaar wat nu als een bedrijf zich wilt aanmelden en daarbij direct een aantal plaatsen wilt reserveren en afrekenen? En dat er geen andere mensen zich op hun bedrijfspagina aan kunnen melden. Hiervoor is de speciale aanmeldflow voor bedrijven beschikbaar! Deze functionaliteit kan door iRaiser per website aan- of uitgezet worden. Inhoud artikel:BedrijfspakketSpecifiek aantal inschrijvingenBedrijf bepaalt aantal inschrijvingenBedrijfspakket toevoegen aan de aanmeldflowAanmeldflow bedrijfMail na aanmeldingHandmatig een bedrijf aanmakenAanmeldflow actiesWerkwijze in combinatie met activiteitenmoduleDashboardBedrijven en acties Zie hier het filmpje met meer uitleg over de werking:00:00 - Welkom00:27 - Beginnen met de bedrijfsfunctie01:06 - Bedrijfspakket maken02:48 - Aanmeldingsstroom instellen voor gebruik door bedrijven03:09 - Door de aanmeldingsstroom voor bedrijven lopen05:31 - Extra teamleden toevoegen05:59 - Handmatig een bedrijf toevoegen BedrijfspakketDe aanmeldflow voor bedrijven werkt op basis van één of meerdere bedrijfspakketten. Een bedrijfspakket kan een specifiek aantal inschrijfbewijzen zijn, maar kan ook een door het bedrijf zelf op te geven aantal zijn. Aan een pakket kunnen zaken naar wens worden toegevoegd, zoals promotie-uitingen, t-shirts etc. Zo kan je bijvoorbeeld een brons, zilver en gold pakket samenstellen. Om de aanmeldflow voor bedrijven te kunnen gebruiken dient er minimaal één bedrijfspakket aangemaakt te worden. Je gaat naar de plek in het platform waar je deze toe wilt voegen (bijvoorbeeld direct onder de website, of bij een bepaald project) en gaat naar Instellingen > Bedrijfspakketten. Vervolgens klik je op Bedrijfspakket toevoegen en kom je in dit scherm: Je hebt twee keuzes:Specifiek aantal inschrijvingenBedrijf bepaalt aantal inschrijvingenSpecifiek aantal inschrijvingenBij deze keuze staat de inhoud van het pakket vast. Bijvoorbeeld een bedrijfspakket waarbij je 10 plekken afneemt. Hier vul je het volgende in:Titel van het pakketOmschrijving van de inhoud van het pakketAantal inschrijfplekkenTotaalbedrag voor het pakket (dit bedrag kan ook 0 euro zijn)Bedrijf bepaalt aantal inschrijvingenHier staat de prijs per plek vast, maar bepaalt het bedrijf zelf hoeveel plekken zij willen reserveren en afrekenen.Je vult per bedrijfspakket het volgende in:Titel van het pakketOmschrijving van de inhoud van het pakketBedrag dat per inschrijving betaalt dient te worden (dit bedrag kan ook 0 euro zijn)Bedrijfspakket toevoegen aan de aanmeldflowNu het bedrijfspakket aan is gemaakt is het zaak om de mogelijkheid tot bedrijfsinschrijving toe te voegen aan de aanmeldflow. Dit doe je door (op de plek waar je dit toe wilt voegen) naar Instellingen > Aanmeldflow te gaan. Je kunt hier vervolgens kiezen uit deze opties: Aanmeldflow bedrijfDe aanmeldflow ziet er als volgt uit:1. In het keuzescherm 'Hoe zet jij je in' is er de mogelijkheid bijgekomen om je als bedrijf in te schrijven2. In de volgende stap kies je een pakket. Als het een pakket is waarbij er alleen een bedrag per inschrijving geldt, dien je hier ook het aantal in te vullen3. In de stap daarna vul je alle bedrijfsgegevens in4. Hier vul je de gegevens in van de contactpersoon. Deze persoon wordt ook de beheerder van de bedrijfspagina5. Daarna maak je de bedrijfspagina aan. Je uploadt een logo en vult de titel en motivatie en het streefbedrag in6. Extra vragen (optioneel)Je ziet deze pagina alleen als er extra vragen toe zijn gevoegd op bedrijfsniveau. Wil je deze toegevoegd hebben? Neem dan even contact op via support-nl@iraiser.eu 7.Op de overzichtspagina controleer je alle ingevulde gegevens en daarna ga je naar het betaalscherm Mail na aanmeldingNa aanmelding krijg je een mail toegestuurd: In die mail staat een link waarmee iemand zich direct in kan schrijven. Deze link deelt men met de collega's die mee willen doen en dan kunnen ze direct een actiepagina aanmaken! Deze link is ook te vinden in het beheerdersdashboard.Handmatig een bedrijf aanmakenJe kunt ook handmatig bedrijven toevoegen vanuit het dashboard. Dit doe je door naar de plek te gaan waar je het bedrijf toe kunt voegen (bijvoorbeeld op een bepaald project). Vervolgens klik je op Bedrijven en daarna op Toevoegen. Als je deze optie niet ziet, neem dan even contact met support-nl@iraiser.eu op. Dan moet de functionaliteit nog aangezet worden.Vervolgens vul je alle velden in die je normaal gesproken ook had moeten invullen. De velden met een sterretje (*) zijn verplicht. Na het invullen en opslaan is het bedrijf aangemaakt. Er worden geen mails verstuurd bij het aanmaken van het bedrijf via het dashboard.Aanmeldflow actiesDe aanmeldflow voor iemand die met zo'n link een actiepagina aanmaakt ziet er zo uit:1. Begin aanmeldflow. Hier zie je waar je je voor in gaat schrijven 2. We zijn benieuwd wie je bent. Hier maakt je je profiel aan3. Jouw persoonlijke pagina. Hier vul je je titel en motivatie in en hoeveel geld je op wilt halen4. Overzichtspagina waar je de ingevulde gegevens kunt controleren. Omdat er al betaald is kun je direct naar afronden gaanNu is de actiepagina van een collega aangemaakt. Een bezoeker kan doneren aan die actiepagina of aan het bedrijf.Werkwijze in combinatie met activiteitenmoduleWordt er ook gebruik gemaakt van de activiteitenmodule, dan wordt deze niet uitgevraagd in de aanmeldflow van het bedrijf. In plaats daarvan kiezen de bedrijfsleden bij het aanmaken van hun actie de gewenste activiteit. DashboardIn het dashboard is er een nieuw menu-item bijgekomen genaamd Bedrijven. Hier komen alle aangemelde bedrijven te staan. Als je op het 'i-tje' drukt dan krijg je de gegevens van het bedrijf te zien. Hier zie je ook de link staan waarmee men zich in kan schrijven. Ook kun je vanaf het overzicht een Excel-bestand downloaden. Hier zie je een voorbeeld van de output hiervan. Bedrijven en actiesEen actiestarter die zich aan heeft gemeld via een link (ik noem deze hieronder even 'Bedrijfsacties') kun je zien als een reguliere actie (die dus niet onder een bedrijf is aangemaakt), maar er zijn toch een paar verschillen. Hieronder een samenvatting:Je kunt geen reguliere actiestarters verplaatsen naar een bedrijf. Omgekeerd kun je ook geen Bedrijfsacties verplaatsen naar (bijvoorbeeld) een project. Bedrijfsacties komen terug in het overzicht van alle actiestarters en ook in de export (en api) van alle actiestarters. Je ziet dan enkele extra kolommen in het Excel-bestand terug. Zie hier een voorbeeld. Wil je deze functionaliteit gebruiken? Neem dan even contact met ons op! Als je beschikt over een vormgeving op maat, dan moet de functionaliteit hier eerst nog ingebouwd worden.
Extra vragen in de aanmeldflow, het donatieformulier en een aangepast formulier op maat
Het is binnen het platform mogelijk om extra informatie uit te vragen. Denk hierbij bijvoorbeeld aan het uitvragen van een shirtmaat, expliciete toestemming van de ouders, het akkoord gaan met het extra deelnemersreglement etc. Maar ook bijvoorbeeld het uitvragen van extra informatie bij het doen van een donatie voor het aanvragen van fiscale attesten of een speciale opt-in om gebeld te worden. Er zijn drie plekken waar wij voor jullie extra vragen toe kunnen voegen. In de aanmeldflow, het donatieformulier en in een aangepast formulier. De extra vragen kun je zelf niet toevoegen. Mocht je dit willen dan kun je contact met ons opnemen en voegen wij deze toe. Inhoud artikelSoorten extra vragenInvulveldenTekstveldTekstareaMeerkeuzemogelijkhedenDropdownRadioCheckboxExtra tekstWaar kunnen extra vragen toegevoegd worden?AanmeldflowDonatieformulierAangepast formulier op maatOp welke niveaus kunnen extra vragen toegevoegd worden?Waar zie ik de ingevulde antwoorden op de extra vragen? Soorten extra vragenInvulveldenWe hebben twee soorten invulvelden, een tekstveld en een tekstarea. Deze twee onderscheiden zich door de grootte van rijen die worden weergegeven. Als je een kort antwoord verwacht dan kies je voor een tekstveld. Hierin stel je een vraag (die een maximum van 40 tekens heeft) een vult de gebruiker een antwoord in: Als je een langer antwoord verwacht kun je werken met een tekstarea: PlaceholderBij een tekstveld of -area kun je een placeholder opgeven. Deze komt dan bij het invullen van de vraag tevoorschijn. Dit kan handig zijn als je de informatie op een bepaalde manier wilt ontvangen, bijvoorbeeld "vul hier de datum in dd-mm-yyyy".ValidatietypesJe kunt een specifieke vorm van een antwoord laten opgeven. Bijvoorbeeld als je een bepaalde datum uitvraagt of een bankrekeningnummer. Als er dan informatie opgegeven wordt die niet voldoet aan die specifieke validatie-eisen, dan wordt het antwoord niet geaccepteerd. Dit zijn de validatietypes die we hebben: MeerkeuzemogelijkhedenWe hebben drie mogelijkheden voor meerkeuzeopties, en bij alle drie kun je er eventueel ook voor kiezen maar één optie weer te geven. Dit zijn de dropdown, radio en checkbox:DropdownBij de dropdown stel je een vraag waarna de gebruiker op de antwoordmogelijkheid moet klikken om deze uit te klappen. Daar kan deze dan een van de keuzes selecteren. RadioBij de radio is de eerste antwoordmogelijkheid default geselecteerd. De gebruiker kan dan kiezen om in plaats van die ene een andere mogelijkheid te selecteren.CheckboxHierbij kan men een of meerdere antwoordmogelijkheden zelf aanvinken.Bij alle bovenstaande vragen (op de radio na) kun je aangeven of dat de vraag verplicht is of optioneel. Extra tekstOm de vragen in te leiden, of wat extra informatie te geven kunnen we titels en infotekst invoegen. Een titel heeft een net iets groter lettertype dan de infotekst. Waar kunnen extra vragen toegevoegd worden?Er zijn drie plaatsen waar we extra vragen toe kunnen voegen. In de aanmeldflow, op het donatieformulier en in een aangepast formulier.AanmeldflowDe extra vragen worden in de aanmeldflow uitgevraagd na het aanmaken van de sponsorpagina (of teampagina/bedrijfspagina) en voor de webshop/startdonatie/overzichtspagina (afhankelijk van welke stappen er in de aanmeldflow zijn):DonatieformulierHet toevoegen van extra vragen aan het donatieformulier werkt hetzelfde en deze zie je vervolgens onder de persoonsgegevens staan. Het enige verschil is dat er op deze plek geen bijzondere persoonsgegevens uitgevraagd mogen worden. Aangepast formulier op maatWe kunnen een aangepast formulier op maat maken. Deze is in de vorm van een menu-item en hierin kun je (los van de aanmeld- en donatieflow) informatie opvragen.Je geeft een e-mailadres op en de ingevulde formulieren worden één op één doorgestuurd naar dat e-mailadres. Deze komen binnen als losse mails en je kunt hier geen Excel-bestand van downloaden.Optioneel kun je nog een bestemmings-url instellen waar de gebruiker, na het invullen van het formulier, automatisch naar door wordt gestuurd.Hieronder enkele voorbeelden van toepassingen van aangepaste formulieren:Aangepast formulier van de Giro di Muscoli voor deelnemers aan de familie-etappeHier vragen ze de deelnemers de namen in te vullen. Aangepast formulier van de Nacht van de Vluchteling om los t-shirts te bestellenAangepast formulier van de Stichting Metakids voor een deelnemersactie.Een actiestarter verkoopt schelpen en deze kunnen via dit formulier besteld worden. Deze actiestarter krijgt de ingestuurde mails binnen en kan de bestellingen matchen aan het betalingskenmerk.Op welke niveaus kunnen extra vragen ingesteld worden?Aangepaste formulieren komen altijd als menu-item terug, maar extra vragen voor de aanmeld- of donatieflow kunnen we op verschillende niveaus instellen. Hieronder zie je welke:Overal op de websiteAlleen op de homepageOp de homepage van een segmentOp een specifiek projectDaarnaast kun je kiezen tussen of de extra vragen gesteld moeten worden aan een actievoerder, een teamstarter of een bedrijfstarter.Waar zie ik de ingevulde antwoorden op de extra vragen?Bij het donatieformulier zie je deze in je dashboard bij de donatie zelf staan als je op het 'oogje' klikt. Daarnaast kun je deze vinden in het Excel-bestand van de donaties. Daar is een extra tabblad bijgekomen waar de ingevulde antwoorden op de extra vragen staan.Bij de aanmeldflow zie je de extra vragen bij de acties/deelnemers staan als je op het 'oogje' klikt. Daarnaast kun je deze vinden in het Excel-bestand van de acties. Ook daar is een extra tabblad bijgekomen waar de ingevulde antwoorden op de extra vragen staan. Bij de teams en bedrijven werkt het op dezelfde manier (klikken op oogje, en in de export van respectievelijk teams en bedrijven)Bij een aangepast formulier worden de ingevulde resultaten gemaild naar het opgegeven e-mailadres. Wil je extra vragen toegevoegd hebben? Neem dan contact met ons op.
Prestatietracker
Bekijk hier het filmpje met uitleg over deze functionaliteit. Met de prestatietracker kan een actievoerder sportieve prestaties toevoegen aan zijn actiepagina. De afgelegde afstand wordt opgeteld en getoond op de actiepagina. Een actiestarter kan ook een koppeling leggen met zijn Strava-account, waarna nieuwe prestaties automatisch toegevoegd worden aan zijn pagina!Bovendien wordt de totale de totale afstand van alles acties opgeteld en weergegeven op de homepage.Inhoud artikel:PrestatiesDoel instellenPrestatie toevoegen (handmatig) StravaAanmaken van een Strava appKoppelen van je eigen Strava account aan een actiepaginaOntkoppelen StravaGebruik prestatietrackerPrestaties uitzettenZichtbaarheidExcel-bestandDoelafstand bereikt e-mailPrestatietracker onder de aandacht brengenPrestatiesEen actiestarter kan prestaties toevoegen door in te loggen in zijn dashboard. Daar staat een tabje 'Prestaties' dat er zo uitziet:Doel instellenNet als bij het instellen van een streefbedrag kan een actievoerder een doel instellen voor zijn prestatie. In dit geval is dat een bepaald aantal kilometer. Als de prestatietracker aanstaat dan wordt de doelafstand ook (optioneel) uitgevraagd in de aanmeldflow. De nieuwe vraag zie je onderaan staan: Prestatie toevoegen (handmatig)Het prestatie toevoegen scherm ziet er als volgt uit:Als eerste kies je voor een Sport. Je kunt hier kiezen uit Hardlopen, Wandelen, Fietsen, Zwemmen, Schaatsen, Skeeleren of Anders (voor alle overige sporten). Vervolgens geef je de prestatie een titel. Deze komt op je actiepagina bovenaan te staanDaarna vul je de omschrijving in van de prestatie. Dit is optioneel, je kunt ook zonder deze in te vullen verder gaan.Vul vervolgens de Datum en tijd inVoeg je afgelegde afstand toe en klik op opslaanJe ziet dat de actie is toegevoegd en dat het afgelegde aantal kilometers is bijgewerkt. Bij 'bron' staat een Kentaa-icoon dat aangeeft dat deze via het platform is toegevoegd. Bij de actiepagina aan de voorkant ziet dit er zo uit:Hierbij is 'Rondje Veluwezoom' de Titel en de tekst eronder de omschrijving. Op de homepage is er onder de donatieteller het aantal kilometers dat over het hele platform is afgelegd bijgekomen:StravaJe kunt er ook voor kiezen om een koppeling te maken met Strava. Strava is een app die veel sporters gebruiken om hun prestaties mee te tracken. Om niet op twee plekken de sportieve prestaties te hoeven invoeren hebben we een koppeling gelegd met Strava.Elke activiteit die daar wordt toegevoegd wordt vervolgens doorgestuurd naar de prestatiepagina van de deelnemer en onder de juiste sport weggeboekt. Voordat je dit kunt doen moet er eerst eenmalig een Strava app voor het platform aan worden gemaakt: Aanmaken van een Strava app Om Strava werkend te hebben op jullie platform moet er een algemene koppeling met de Strava app aangemaakt worden. Dit mag je persoonlijke account zijn en is puur bedoeld om de technische koppeling te realiseren met het platform. Er gebeurt verder niks met je informatie of account. Het gemakkelijkste is het om hier een nieuwe Strava-account aan te maken met een algemeen bedrijfs e-mailadres. Dit heb je alleen nodig om de koppeling te leggen. Daar worden verder geen mails naar gestuurd (dat kun je in het aanmeldproces uitvinken). Wel is het sinds 1 juli 2026 nodig om hier een abonnement op af te sluiten, omdat anders geen gebruik meer gemaakt kan worden van de api van Strava.Als die app goed is geïnstalleerd kunnen actiestarters via het platform koppelen met hun eigen Strava-account.Hieronder een stappenplan om dit te doen.1. Maak een account aan op www.strava.com (dit is een persoonlijke account)2. Ga (al ingelogd) naar https://www.strava.com/settings/apiVul onderstaande in:Naam van toepassingHier vul je de gewenste naam van de app in, doorgaans de naam van de site of van jullie stichtingCategorieKies hier voor 'Liefdadigheidsinstelling'ClubDeze kun je leeg latenWebsiteVul hier de url van de website in (met https:// ervoor)Beschrijving van toepassingHier kun je een beschrijving geven van de toepassing van de appAuthorisatie van callbackdomeinVul hier oauth.kentaa.nl inKlik op akkoord en op creëren om verder te gaan3. Upload daarna je app-pictogram4. Stuur daarna de Client ID en Client Secret naar ons op. Wij voegen deze vervolgens aan het platform toe, zodat dit technisch gekoppeld wordt. Zorg ervoor dat je geen screenshot stuurt, maar vooral het ID en secret kopieert. Anders is het lastig over te nemen. 5. Uitbreiden aantal sporters in appBij nieuwe apps zet Strava een restrictie op het aantal sporters dat toegestaan is verbinding te maken. Deze staat standaard op 1. Je kunt dit zelf handmatig ophogen naar maximaal 10 sporters (door de knop 'Lid worden' te gebruiken). Pas wanneer er daadwerkelijk 10 sporters met jouw app gekoppeld zijn, kun je bij Strava een verzoek indienen om dit aantal verder uit te breiden naar 999. Om deze uitbreiding aan te vragen, kun je dit contactformulier invullen. Zie hier een voorbeeld van hoe je dit formulier invult en hier en hier voorbeelden van screenshots die je kunt bijvoegen. De support van Strava neemt de aanvraag daarna in behandeling. Let op: zij geven soms geen of beperkt terugkoppeling als het is aangepast, dus je zult zelf tussentijds moeten inloggen om te controleren of de limiet is verhoogd. En ook kan het zijn dat ze de app afkeuren, die vrijheid hebben ze.6. Abonnement StravaSinds 1 juli 2026 kun je alleen nog maar gebruik maken van de Strava API als je een abonnement hebt op Strava. Daarom moet je een Individueel Lidmaatschap starten voor die account. We kunnen niet met zekerheid garanderen dat het altijd blijft werken, want vanuit Strava wil er nog wel eens het een en ander wijzigen. 7. Periodieke reviewsStrava kan periodiek apps controleren. In zo'n geval mailen ze naar het e-mailadres waarmee de app aan is gemaakt. Het is dan van belang om die controle te doen, anders kunnen ze op een bepaald moment de app uitschakelen/restricties toevoegen. Koppelen van je eigen Strava account aan een actiepaginaNu de Strava app gekoppeld is aan het platform verschijnt er een Strava icoontje:Klik op connect en geef de app toestemming. Vervolgens komen nieuw toegevoegde activiteiten binnen Strava automatisch op de actiepagina (dit kan tot 10 minuten duren). Hieronder een voorbeeld van een activiteit die via de koppeling is toegevoegd (let ook op het Strava icoontje):En aan de voorkant ziet dit er zo uit:De prestatie hierboven (25,23 km) was handmatig ingevoerd in Strava en daardoor was er ook geen kaart beschikbaar. Als er wel een routekaart beschikbaar is dan zie je hier een kaartje van bij de prestaties. Een voorbeeld hiervan:Eventuele foto's die tijdens het opnemen van de prestatie in Strava zijn gemaakt komen ook mee. Zie bijvoorbeeld deze wandeltocht:Ontkoppelen StravaDe eigenaar van de actie heeft de mogelijkheid om de Stravakoppeling ongedaan te maken. Dat kan vanuit zijn/haar Strava-account, maar ook vanuit het actie-dashboard binnen iRaiser. Hiervoor klik je op het tabblad prestaties op het Strava disconnect kruisje (in het screenshot rechtsonder):Een sitebeheerder kan geen individuele Strava-koppelingen ongedaan maken (tenzij hij eigenaar van de actie is). Wel kan een sitebeheerder ervoor kiezen de prestatietracker op een niveau (bijvoorbeeld voor een project) uit te zetten. Als dat gebeurt dan worden alle prestaties gewist en koppelingen met Strava verbroken. Zie hiervoor Prestaties uitzetten. Gebruik prestatietrackerJe kunt per niveau aangeven of dat je gebruik wilt maken van de prestatietracker. Dat kun je op websiteniveau en per segment of project aan- of uitzetten. Ook kun je aangeven of dat je het aantal afgelegde kilometers in de tellerstand wilt zien. Dit kun je op segment- of op websiteniveau instellen via Instellingen > Prestaties. Prestaties uitzettenAls er nog geen prestaties zijn toegevoegd onder een project dan kun je de prestaties aan- of uitzetten zonder consequenties. Als er al wel prestaties zijn toegevoegd dan krijg je bij het uitzetten van prestaties (door het uitvinken dat er gebriuk mag worden gemaakt van prestaties) een melding met een indicatie hoeveel Strava-koppelingen en prestaties worden verwijderd.Het uitzetten van prestaties kan handig zijn om het aantal kilometers weer naar nul te zetten, bijvoorbeeld bij een challenge die een maand duurt en een bepaalde startdatum heeft. Wel is het zaak om in zo'n geval de actiestarters te informeren. Hun eerdere prestaties en doelaantallen kilometers zijn dan verwijderd, dus dienen ze opnieuw te koppelen met Strava.ZichtbaarheidAls je de knop 'Toon het aantal afgelegde kilometers op de pagina' uitzet dan wordt er geen totaalaantal kilometer getoond bij de donatieteller. Dit kan handig zijn als je nog niet wilt laten zien wat de eindstand van de challenge is, of als het totaalaantal kilometers op die plek niet relevant is. Dit kun je alleen op website- en segmentniveau instellen. Excel-bestandAls je een export maakt van alle acties en gebruik maakt van de prestatietracker, dan staan in de export vier kolommen hierover. Dit zijn de kolommen Doelafstand, Afgelegde afstand (km), Afgelegde afstand (%) en Prestatie Bron. De afgelegde afstand (%) geeft het percentage weer in hoeverre de doelafstand behaald is. Bij Prestatie bron zie je op welke manier(en) er prestaties zijn geüpload.Doelafstand bereikt e-mailAls je de doelafstand behaald hebt, dan wordt er een automatische mail gestuurd (mits deze aan staat). Die ziet er als volgt uit:Je kunt de mail naar eigen wens aanpassen via E-mails > Overzicht e-mails > Actiestarters > Prestatiedoel van de actie is bereikt. Prestatietracker onder de aandacht brengenDe prestatietracker is alleen te vinden voor de actiestarter als deze inlogt in zijn/haar eigen dashboard. Deze wordt niet getoond tijdens het aanmaken van een actie en daarom is het van belang om deze onder de aandacht te brengen. Hieronder verschillende manieren waarop je dit zou kunnen doen:NieuwsberichtAls er al diverse acties gestart zijn en je die wilt bereiken kun je dit doen via een nieuwsbericht. Je kunt een nieuwsbericht opstellen en publiceren en dan kun je ervoor kiezen het bericht te delen met de bestaande actiestarters. Op die manier kun je ze op de nieuwe functionaliteit wijzen!Menu-pagina met uitleg over de prestatietrackerJe kunt ook een menu-pagina aanmaken met meer uitleg over de werking van de prestatietracker en hoe jullie deze gebruiken. Hier kun je eventueel ook naar verwijzen in de automatische mails of in een nieuwsbericht. Krijg je vragen van actiestarters over de prestatietracker? Neem deze dan op in een veelgestelde vragen blok!Automatische e-mail De beste manier om nieuwe actiestarters te wijzen op de prestatietracker is via een e-mail die elke actiestarter ontvangt. Wijs ze hierin op de mogelijkheden van het toevoegen van prestaties. Je kunt ervoor kiezen de prestatietracker op te nemen in de mail na het aanmaken van een actie, maar ook bijvoorbeeld de mail die drie dagen na het aanmaken van een actie wordt gestuurd. Wil je een voorbeeld hebben van een tekst van een automatische mail of van een menu-pagina? Klik dan hier voor een pdf-bestand met teksten en schermafbeeldingen die je zou kunnen gebruiken! Je kunt op basis hiervan ook een nieuwsbericht opstellen. De prestatietracker kunnen wij voor al onze generieke templates direct aanzetten. Als je dit aan wilt hebben dan kun je contact met ons opnemen waarna wij de functionaliteit zullen aanzetten. Als je ons ook de Client ID en Client Secret stuurt kunnen wij de koppeling met Strava ook direct leggen.