


Webshop e-tickets
Last modified: 24-12-2025Ticketing via the webshop (“Ticketing”)
Are you organising an event that requires tickets for attendees? If so, our webshop's ticketing feature could be the perfect solution. This feature allows you to create tickets automatically for your campaign, allowing you to stay organised and ready for your event.
Features:
This feature allows you to:
- Create varied ticket types based on cost.
- Register the data of the person who buy the tickets, also for future communications.
- Manage ticket availability and the maximum tickets that a supporter can purchase (this can be more than one if needed). During the event, easily track who is attending, and report the final attendance of the event in one click.
- Scan ticket during the event, and also add volunteers who can help with scanning
To activate this feature, let’s go through the steps to enable this:
Enable e-tickets with the webshop
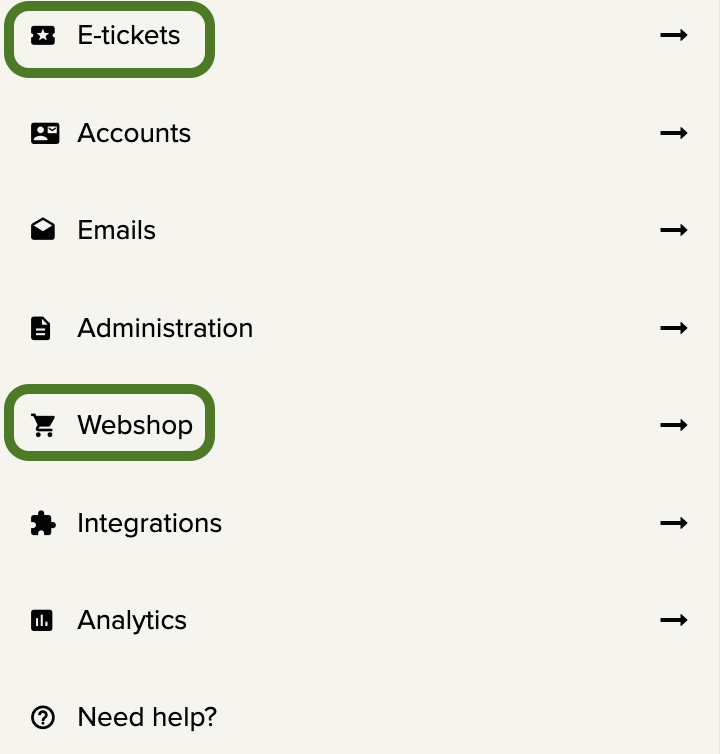
First of all, check if the “E-tickets” and “Webshop” features are enabled in the left bar of your platform.
Then, check if it's possible to turn off the creation of the fundraising page under Settings → Fundraising page.
If this is not possible, please contact iRaiser support. We will check if the feature is included in your plan and then activate it for you.
Create your ticket(s)
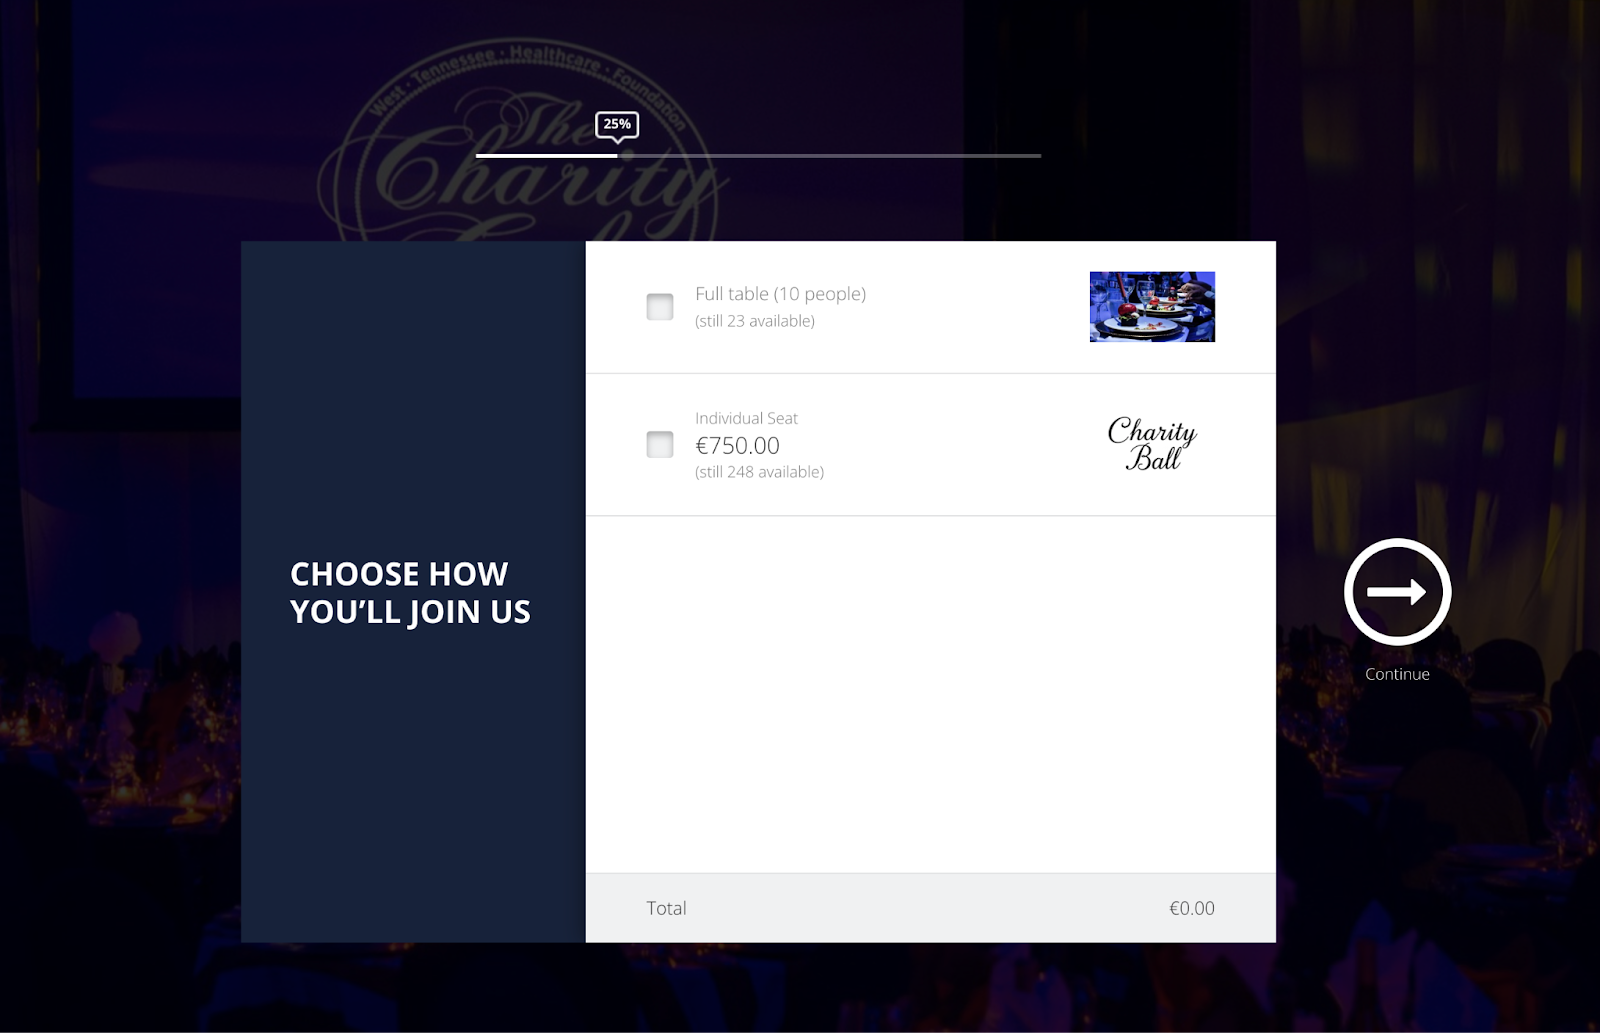
To add a ticket item, go to Dashboard > Webshop > Catalog. From there, enable the webshop, add a new item, and select the 'ticket' option. You can then give the ticket a name and an amount. If it's a free ticket, simply enter "0."
Additionally, you can indicate availability and set an order limit. This way, you maintain control over the number of available tickets. For example, you could create a ticket with 250 spots available, and allow a single buyer to order only four of them.

You can, of course, create more than one type of ticket, with different availability and order limits for each.
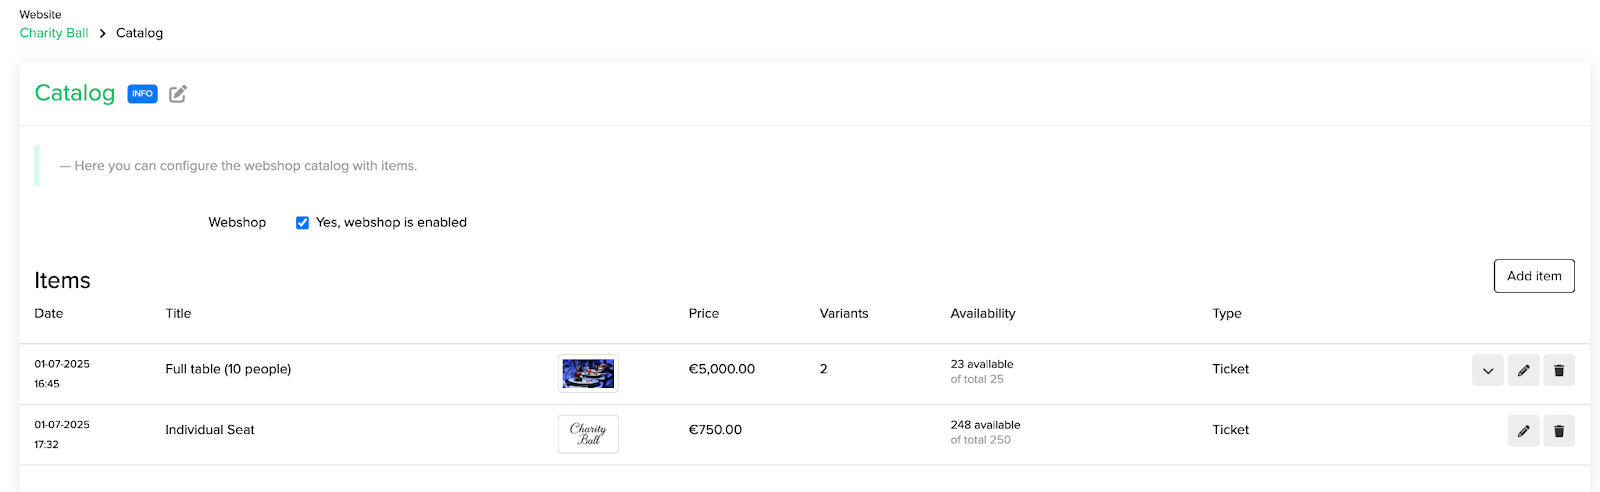
We also recommend adding an image; this makes the ticket visually recognizable in the registration flow. If a ticket is sold out, it will be grayed out. If it is the only type of ticket available, it will disappear completely from the registration flow.
Remember to check where the tickets are available to supporters. If you create a ticket at the website level and make it available in a campaign, that ticket can be sold at both layers. Availability will be influenced by both: if there are 100 tickets available and one is bought at either the website or campaign layer, then there will be 99 tickets available for the next purchase, regardless of whether it happens on the website or in the campaign.
Set up the “Sign up flow”
The Sign up flow is the process a person goes through to register on the platform. In this case, it's for purchasing tickets. Let’s see how to create a simple registration flow for ticket purchase.
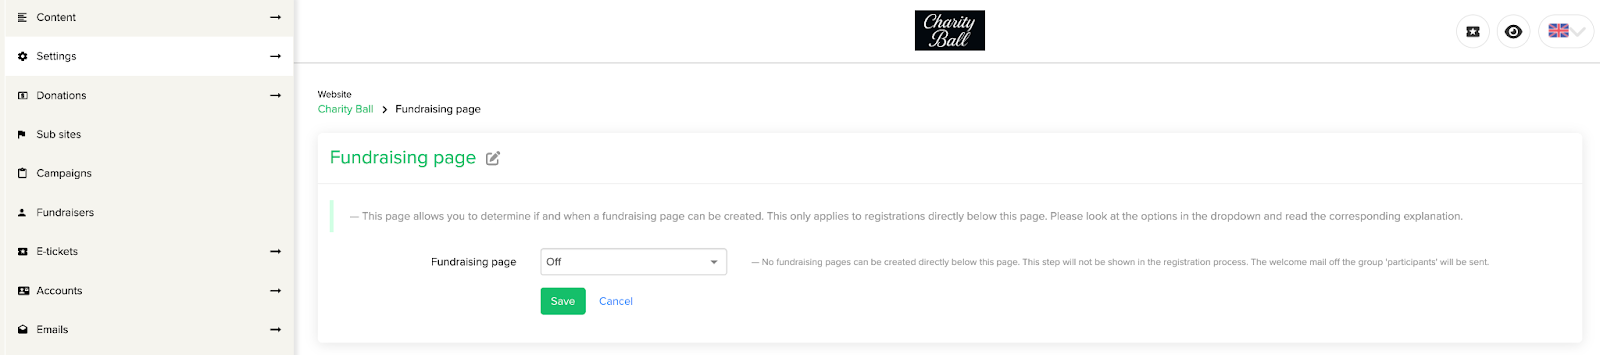
Turn “Create a fundraising page off”
On Community Fundraising Platform, by default, the person who registers is asked to create a fundraising page. For ticket purchases, we may not want them to create a page, so we need to go to Settings → Fundraising page, and then select “off”.
Disable (or not) the “Start Donation”
During the sign-up flow, you may ask people to make an additional, optional donation. If you don't want to add this step to make the ticket purchase even more straightforward, go to Settings → Start donation and uncheck that option.
Customize the Sign up flow
- It’s time to manage the steps of the registration process. Go to Settings → Sign up flow.
- If your website has different registration options (individual, team, etc.), you can turn them off for this layer where you want to sell tickets. We also suggest “show webshop” as the first step, so that the available tickets are the first thing presented, even before asking for registration data.

You can then customize the text shown in every step of the flow on the left hand side: click on the second tab, “Sign up flow”, and then on “edit” corresponding to the step you want to modify.
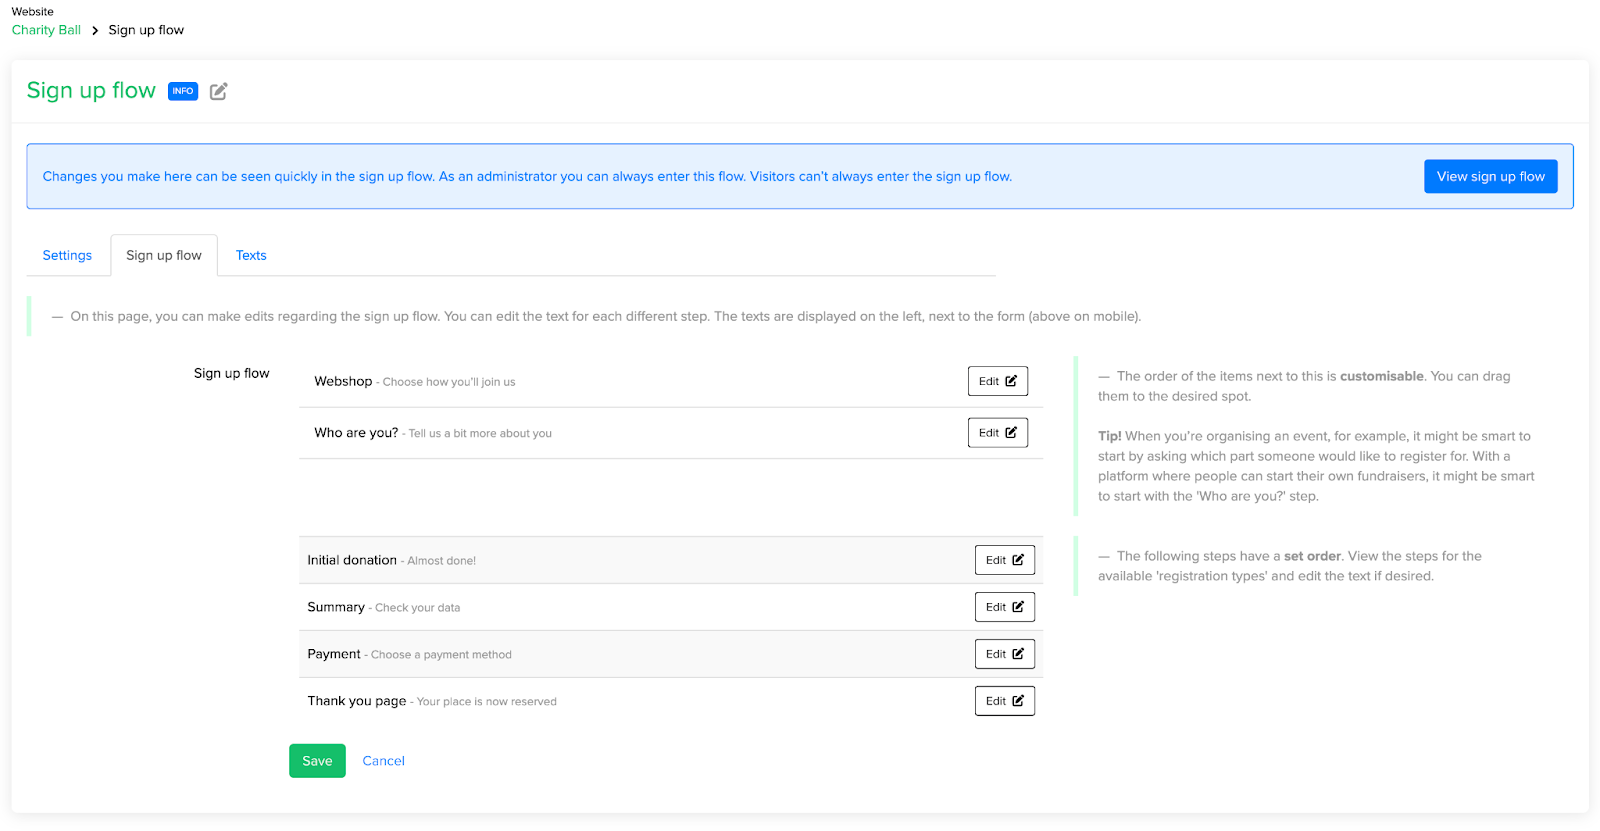
Remember that you can also customize the “Thank you page”, which is the page displayed after tickets are purchased. You can add text to reassure the buyer and build excitement for the event. For example: "Thank you for purchasing your tickets! You'll find them in your email in a few minutes. We're looking forward to seeing you at the event!"
In the last tab, “Texts”, you can customize the registration button with a more event-related call to action, like “Reserve your place” or “Buy tickets”.
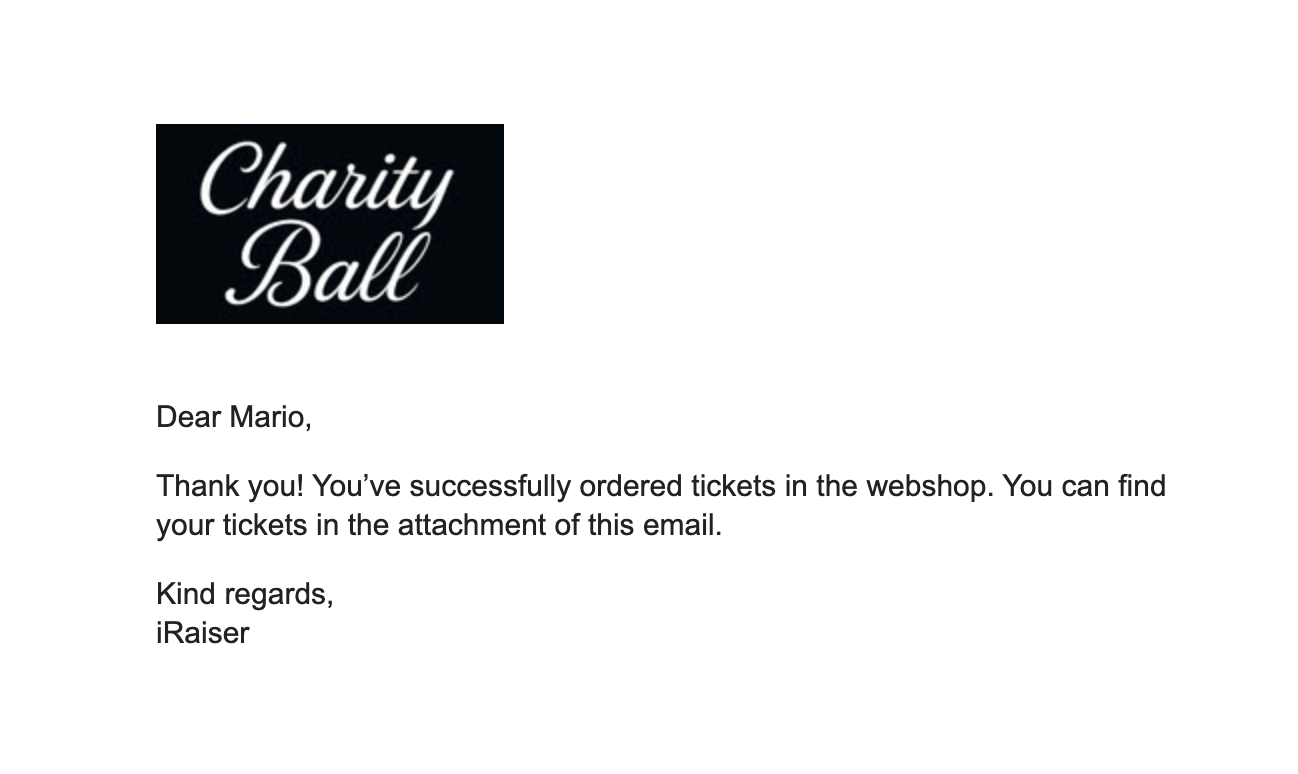
Emails
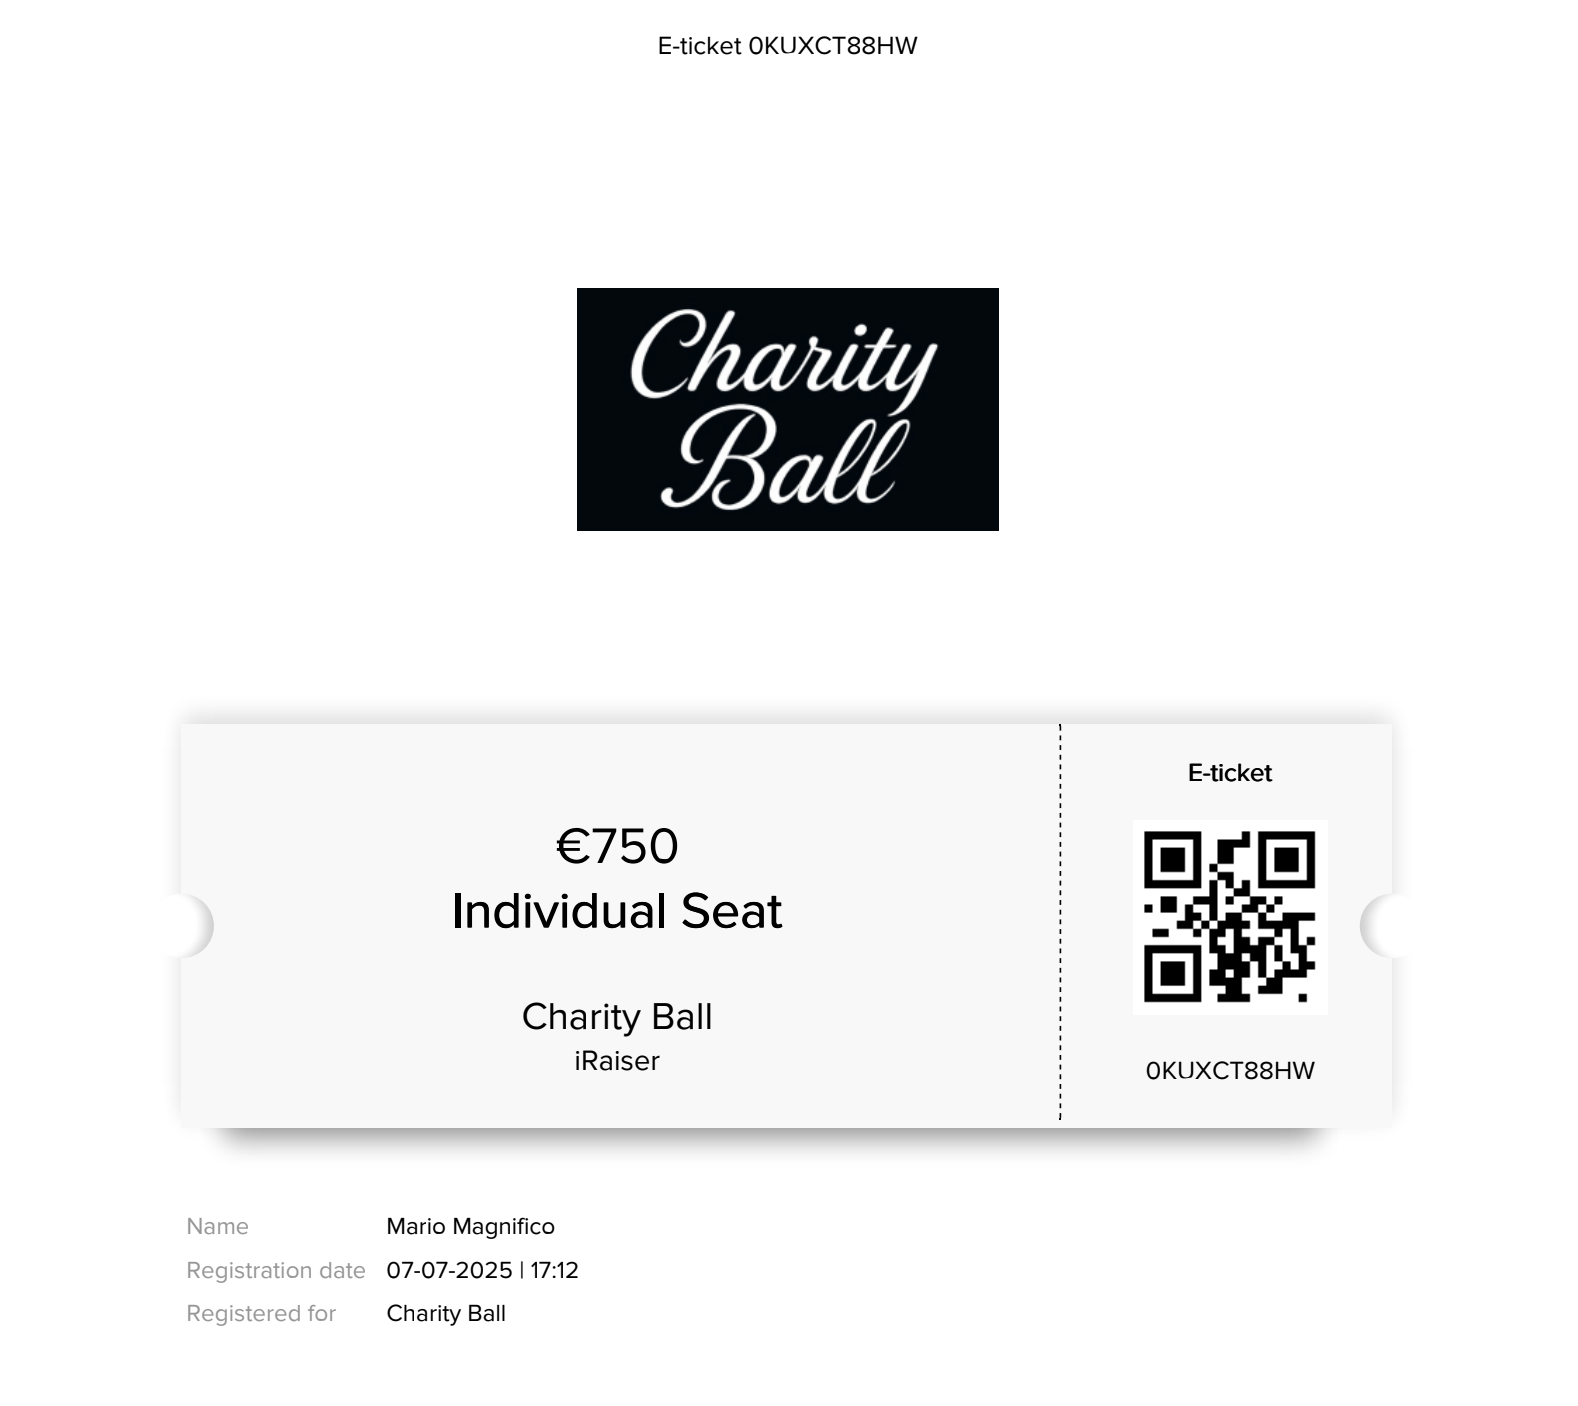
Once a client purchases tickets, they will receive related emails. The most important one will contain the PDF of the tickets attached, with one PDF per ticket.
A single ticket will look like this:
Note:
- The time it takes to generate them is proportional to the number of tickets. If only one ticket needs to be generated, it will take a few seconds. If 10 tickets need to be generated, the email will take a little longer to be sent.
There are three emails to consider when enabling the ticketing system:
- “Set your password”: This is the standard email sent to any new user creating an account on the platform.
In the email section of the layer where you created the tickets, you can then find the “participant” section.

Here you may want to customize:
- Welcome email new participant: This is the email the purchaser will receive just after they have signed up for the event.
- Thank you mail for webshop ticket(s) order: This is the email with the various tickets attached. If the purchaser buys new tickets, they will receive another email like this one with the new tickets.
Managing event attendance
Once the event begins, you may want to manage the attendees. Each ticket has a QR code and a unique code on it.
By clicking on E-tickets → E-tickets webshop → Overview, you will find the complete list of all the tickets generated. You can search for them by purchaser name or ID.

You can even scan the QR code with your camera (by clicking on the icon in the top right corner of the page), or create “scanner” users. Those are specific users that are only allowed to scan the tickets (they can not download data, they can not modify the contents…). Depending on the level you added them, they can scan tickets from that level. For example when you add a scanner to a specific campaign, they can only scan tickets from that campaign.
Differences between tickets from participants and tickets from the webshop
In the Community Fundraising Platform, you might encounter another way to generate tickets: "participant tickets."
Both types provide a PDF ticket with a scannable code, but there are some differences in how they can be used.
Participant Tickets are primarily designed for events where individuals are asked (or encouraged) to set up a fundraising page and are mainly registering themselves. Marathons or other sporting events are good examples of this. If someone wishes to register more than one person, they will need to go through the registration process individually for each person. The ticket can be sent to the purchaser at a different time than when it was bought.
Webshop Tickets, on the other hand, are intended for events where the main focus is simply allowing people to attend the event itself. The purchaser can buy multiple tickets in a single transaction, and the registration process can be significantly simplified by offering the ticket as the first step and removing steps like creating a fundraising page. Tickets are sent right after they're bought.
If you are hosting a conference, a gala evening, or a concert, webshop tickets are the ideal choice for you.
 Frequently asked questions
 Perhaps also interesting