


Templates within Kentaa
Last modified: 24-12-2025We have four different templates for our Kentaa platform. If you are using one of the templates and would like to see how the site would look in a different template, you can contact us for this and we can convert it for you.
Below you can see the different flavours.
Template 1
Template 2
Template 3
Template 4 (New!)
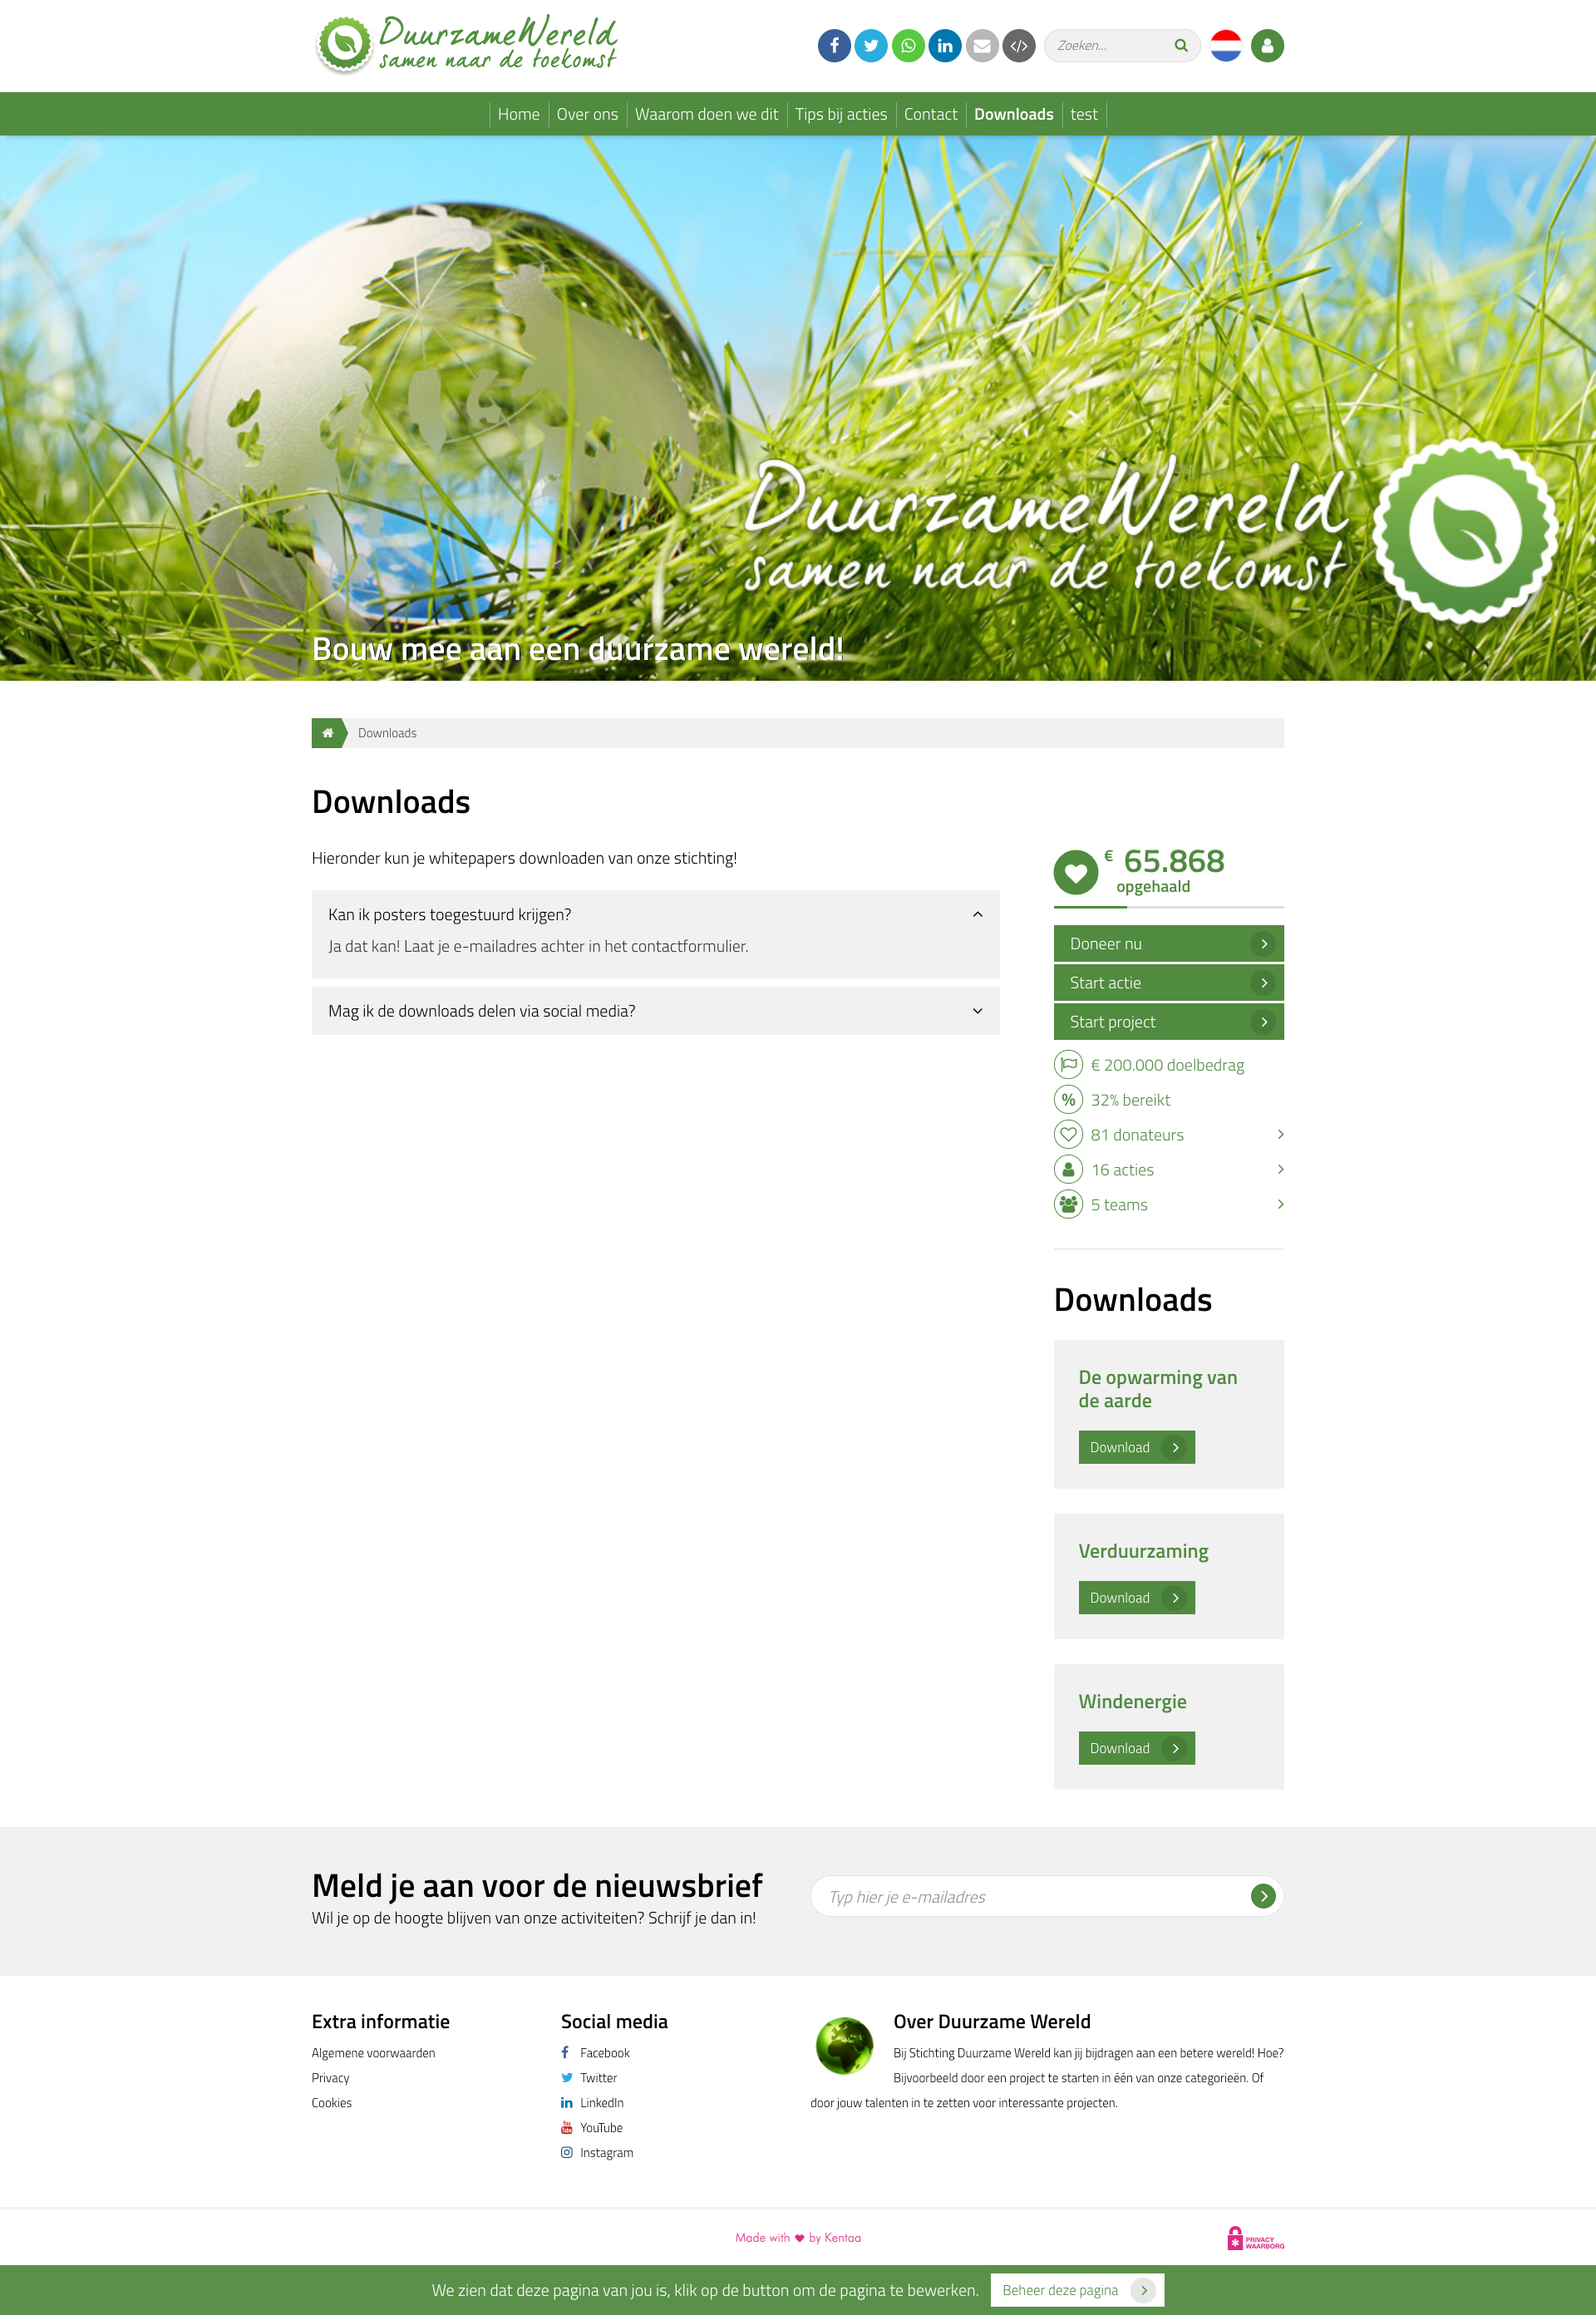
Template 1:
Click on the screenshot to enlarge it
| Desktop | Mobile | |
 |
 |
|
| Homepage | ||
 |
 |
|
| Project | ||
 |
 |
|
| Fundraiser overview | ||
 |
 |
|
| Fundraising page | ||
 Downloads and frequently asked questions Downloads and frequently asked questions |
 |
|
 Contact |
 |
|
Template 2:
Click on the screenshot to enlarge it
| Desktop | Mobile | |
 |
 |
|
| Homepage | ||
 |
 |
|
| Project | ||
 |
 |
|
| Fundraisers overview | ||
 |
 |
|
| Fundraising page | ||
 Downloads and frequently asked questions |
 |
|
 Contact |
 |
|
Template 3: (only for Kentaa Premium)
Click on the screenshot to enlarge it
| Desktop | Mobile | |
 |
 |
|
| Homepage | ||
 |
 |
|
| Project | ||
 |
 |
|
| Fundraisers overview | ||
 |
 |
|
| Fundraising page | ||
 Downloads and frequently asked questions |
 |
|
 Contact |
 |
|
Template 4: (only for Kentaa Premium)
Click on the screenshot to enlarge it
| Desktop | Mobile | |
 |
 |
|
| Homepage | ||
 |
 |
|
| Project | ||
 |
 |
|
| Fundraisers overview | ||
 |
 |
|
| Fundraising page | ||
 Downloads and frequently asked questions |
 |
|
 Contact |
 |
|
 Perhaps also interesting
Connecting a new website
Welcome to iRaiser and nice that we re able to help you with your new site! But what all is involved in creating it? Article content:Global step-by-step plan1. Agreement for a new website2. Creating demo site3. Adjust domainHostingDNSSSL4. Going live Global step-by-step planThis is roughly the roadmap for creating a iRaiser Premium site:Agreement for new websiteThere s agreement to create the siteCreate demo siteiRaiser creates a demo site and adds you as site administrator and you can start filling it immediatelySet up domainThe domain where the site is to be located is set and technically configured and the platform is set up on the new domainLivegangWhen everything is ready, the checkout can be linked to the website and you can go live! In addition to these technical steps, there are a few practical ones:Viewing dashboard training and explanation in support centreKick-off: going through site settings and current connection statusChecklist: have you thought about this before going liveWe will go into each step in detail and specifically what is involved. 1. Agreement for new websiteBefore we can start, an agreement must be given on the creation of the site. This is done in collaboration with the account manager (iRaiser Sales Team). If you are a new customer, an agreement is signed for the use of the platform. If you are an existing customer, simply agreeing to the cost of an additional website is enough. Then the account manager sends a signal to support and the connection starts.2. Create demo siteAfter agreement, we will create a demo site for you. The site is then temporarily on a iRaiser domain, e.g. website.iraiser.eu and we will add you as administrator. From then on, you can already start filling and modifying the site. On the demo site there is a test checkout, with which you can make test payments. So you can create Fundraisers, Teams, Campaigns and make test payments to go through the flows. When going live, we ll be able to remove all test data for you, but then you can already see what the site will look like when it is already filled.Any changes you make on the demo site will also go with it when we eventually put the site on the domain. You will then also receive a connection e-mail from us with an Overview of all the steps and how to carry them out.3. Setting up domainAn important part of any website is the domain name. A domain name is a unique name on the internet on which the platform will reside. For more information about the domain name, see sidn.nl.Every iRaiser website should have its own domain name. Here we distinguish between top-level domains and subdomains.Some examples of top-level domains are:foriraiser.eusupportiraiser.eusupportiraiser.euiraiser-fundraisers.euiraiser-in-action.euinaction-foriraiser.euaction-foriraiser.euSubdomains:fundraisers.iRaiser.eukominaction.iRaiser.eusupport.iRaiser.euNaturally, these are just examples and can also be chosen to be completely customised.Note! When using the Sub sites module, it must be a top-level domain, i.e. not a subdomain. This is required because each Sub site will have a subdomain.HostingAll iRaiser websites are stored on and served from Amazon Web Services servers in Ireland. We work with 1 codebase on which all websites run and it is not possible to host the website on our own servers. We can hold and manage the desired domain for you. Then we will also immediately set everything up properly technically so that the platform can be transferred. If you also want to attach mailboxes to the domain, it's best to do the hosting yourself, because we don't do that. In that case, we will ask you to set up some DNS data, which we will forward to you. DNSA domain name is a unique name on the internet. A domain name has a long number as its address: the IP address. Because such’a number is difficult to remember, domain names were invented. The domain name system translates the IP address into a domain name and serves as a mask for the IP address. The IP address leads to iRaiser's servers where the website physically resides. The domain is usually owned by you and does not necessarily have to be sémanaged by iRaiser. To link the domain to our servers, so that the domain knows where to point, we use DNS.Setting up DNS requires some technical knowledge and is usually outsourced to a web hosting company or arranged by an in-house IT person. We ask for this contact during the connection process to make setting up the DNS go as smoothly as possible and not to bore you with technical details.If we manage the domain, we will set up the DNS data ourselves. If you manage the domain yourselves, we will send you the DNS data to be set. With the DNS configuration, we ll supply an A record (for the domain) and a CNAME record for the www part and/or subdomain. For the website to work correctly, it is important that this is copied exactly as it is. In addition, we supply one or more _acme-challenge records. We use these to request the SSL certificate. Are you having trouble setting this up? Then please contact us and send a screenshot of the Settings.We use automatic scaling of servers within Amazon and within this process IP addresses can be changed. The CNAME record ensures that the correct IP addresses are always found behind the domain.After setting the DNS, depending on the TTL (time to live), it can take from 5 minutes to up to 24 hours for the change to be made and visible to everyone.SSLsecuring data is our top priority. Therefore, all our websites are equipped with a secure connection by means of an SSL certificate as standard. This can be recognised on the site by the closed padlock and the https:// indication in the browser's address bar.A Users can see from the SSL certificate (by clicking on the lock) by whom the certificate was issued.The installation of an SSL certificate on the (sub)domain is done by iRaiser. Through the _acme-challenge records, we can periodically renew the certificate automatically. 4. Going liveWhen the site is on domain and the checkout is linked, you are ready to go live! Your account manager will then also contact you to dot the i's and give you some final tips.
New on the platform
Welcome to the iRaiser platform! Nice that you found your way to our support centre. This is the 'heart' of the dashboard with information on how it works as well as tips on how to use it.As you have seen, there are many ways to set up your platform and options to set up. To get you a bit more started, you can find some tips and interesting links and videos below.DashboardWhen you log in, you enter the dashboard. You immediately see an overview page with handy statistics in the middle. If you are in the middle of an event, you can quickly see the daily totals there.Want to know a bit more about navigating the dashboard? Then watch this video with more explanation. Support centreYou get to our Support Centre "SUMO" by clicking on "Need help". You can also get there by clicking the blue info button next to a menu item. Then you go directly to the support article about that page, handy!In our Support Centre, you can not only find help articles explaining more about certain functionalities. You can also find inspiration here. For instance, watch webinars, download a whitepaper or 'browse' SUMO. You can click on any of the categories to read more about them and see underlying articles. Want to see some frequently asked questions? Then click on the FAQ.TipsAre you new to the platform and in the process of getting the platform live? Then read more about connecting a new website.Visit our iRaiser Academy, where you will see all kinds of videos explaining more. We also give regular webinars online, about both the (new) functionalities and how to use your platform even better. To do so, follow the updates at the top left of your dashboard.Do you have a question? Ask it first in SUMO's search window. You will often find an answer to your question there. A good basic understanding of the iRaiser Dashboard will help you use the platform to its full potential. VideosIn the following videos, you will be able to delve into specific topics. To the right, timestamps are displayed, in case you want to go directly to a particular part of the video.Administrators of the platformNavigate the platform la dashboardHow to add contentes to the CFP?DonationsFundraising pagesTeamsEmail moduleSign up flowBasic informationsExtensions and optionsCompaniesAdministrators of the platformCFP dashboard offers several functions that simplify the management of the platform.Navigating the platform00:15 - Login00:24 - The Dashboard02:21 - The Layers Logic04:14 - Hot to get supportCoupons00:00 - Welcome00:25 - Where to find the Coupon feature00:42 - Let's create a coupon03:51 - How to use a couponHow do you fill your website00:00 - Welcome00:34 - Description01:38 - About us02:07 - Banner03:35 - Menu07:07 - News items08:46 - Homepage text / highlighted09:54 - GDPR text10:27 - SponsorDonations00:00 - Welcome00:11 - Overview00:35 - Info donation00:57 - Options donation01:59 - Search a donation02:40 - Download a donation03:01 - Adding a manual donationFundraising pages00:00 - Welcome00:27 - Download overview fundraisers01:40 - Adjust a page02:33 - Adjust my subscription03:14 - Manually adding a fundraising page04:58 - Change the owner of a page06:30 - Move fundraiser 07:29 - Other optionsTeams00:00 - Welcome 00:27 - Overview and download team01:23 - Adjust a team02:46 - Creating teams manually03:49 - Creating team members04:22 - Appoint a team captain05:33 - Move teams06:01- Other options Email moduleOne of the strengths of the Community Fundraising Platform is the automatic emailing module. Thanks to them, it is possible to build a customer journey for donors, participants and fundraisers. How do you set it up? Watch the video below.Emails00:00 - Welcome00:27 - Download overview fundraisers01:40 - Adjust a page02:33 - Adjust my subscription03:14 - Manual adding a fundraise page04:58 - Change the owner of a page06:30 - Move fundraiser 07:29 - Other options Sign up flowTo recruit fundraisers and participants, a good registration process is essential. In the videos below we explain how to set it up.Sign up flow00:00 - Welcome00:13 - Intro & table of content00:58 - Change text within sign up flow01:53 - Change sign up options02:14 - Moving steps within sign up flow02:28 - Change start fundraising button02:42 - Sign up flow step by step03:04 - GDPR Texts an menus03:46 - Create team page03:56 - Default contents and settings05:02 - Create fundraising page05:24 - Start donation05:57 - Overview page06:08 - Payment page06:22 - Thank you page Sign up flow extensions and options00:00 - Welcome00:41 - Registration fees02:08 - Activities 03:21 - Editions & badges05:26 - Countdown date05:50 - Achievement06:09 - Additional questions06:28 - Web shop07:15 - CouponsRegistration flow for companies00:00 - Welcome00:27 - Start with the company's feature 01:06 - Create a company package02:45 - Setup sign up flow for the use of companies03:08 - Walking thru the sign up flow for companies05:30 - Add additional team members05:57 - Manually adding a company